Why you’re probably wrong about NFTs

It’s a clear-cut-clickety-click-bait title, but I’m not sorry about it as I don’t think it contains even a nanogram of hyperbole. There has been multiple megatons of guff released into the atmosphere about NFTs, and the misinformation keeps being echoed and amplified. I’ve read that to mint an NFT will waste the same electricity as it takes to power a household for 3 months, a year, two years. You decide. Crypto will lead to the oceans boiling, and eventually cause your hair to melt into a protein skull cap (I made that last one up, let's see if it starts doing the rounds… #legohair). Apologies for being flippant, but there’s clearly some significant levels of BS being shovelled around here and I’d rather laugh than cry. Whilst doing so, I hope to give you some clean signal to cut through all the noise. I genuinely hope you’ll change your mind about NFTs after reading this… unless you already know what’s coming.

Full disclosure, I have no skin in the game (yet). I’m not invested in any NFT projects, I don’t own any and neither have I minted any (yet). I’m just standing on the sidelines for a little, waiting for the mania to settle, and work out where the best platform is going to be for me to sell my art.

It seems that many folk are misunderstanding the use-cases of NFTs, even those who grasp the complexities of the crypto space. After 4 or 5 months of daily research, there is still so much about the industry that I am yet to comprehend. My point being is that reading a handful of biased articles (this one included) and irrevocably making up your mind isn’t exactly due diligence. It is also too easy to find articles that align with your confirmation bias. DYOR, but please conduct it with caution and an open mind. Off the bat, a common misconception is that NFTs can only represent digital files. If that was it and all about it, I wouldn’t be writing this piece. People didn’t get the point of text messages or emails when they first appeared, but I believe NFTs will be as ubiquitous as both of those applications in the relatively near future. I see a world where ownership of cars, homes, designer goods, tickets etc. will all be verifiable via NFTs and the blockchain. Ticket-touts and knock-off merchants will not be best pleased. 

Should you wish to invest in property for example, but don’t have a spare £150k bobbing around to buy an AirBnB apartment, you could buy a fraction of the holiday let with, say £1000, and the smart contract would automatically send you your portion of the rental income, whilst forwarding the management company their dues. It will all happen without you needing to lift a finger as it’s written into the NFT smart contract. Clever stuff. Another arena where NFTs are gaining traction is within the music industry. It has been bought to its knees over the last couple of decades due to digital file stealing sharing and streaming platforms have often left emerging artists out in the cold. NFTs provide a way for artists to release an album directly from their stable that can have unique features embedded such as interviews, videos, alternative artworks etc. Some are even selling a percentage of their copyright within the NFT, with claims that they could spell the end of record labels as we know them. Whilst that may be a little far-fetched at this stage, anything that redirects profits from music industry moguls, instead flowing directly into the pockets of the artists is a positive in my mind. The same concepts can be applied within the art industry, and you won’t need third parties to gatekeep you unleashing your vision on the world. It’s a further step in the right direction towards the democratisation of our art. NFTs are simply another way to connect personally with your fans whilst providing an additional income stream for you to keep creating your work. They don’t need to cost $69M either.

Hollicombe.jpg

The main criticism of NFTs we need to discuss is, you guessed it, power consumption. There has frankly been too much uninformed or poorly researched angst bleeding in the streets about this. Its upsetting for so many reasons, with the infighting between artists of primary concern. Let’s face it, if we’re scrapping amongst ourselves, these are pitch-black days indeed. Of course we’re not droids and we all need to form our own opinions on, well, everything, but I’m sure we can all agree on some fundamentals such as any form of discrimination is bad, causing intentional harm to others is wrong, and doing our upmost to preserve our wonderful planet is the only way forward. Please understand that any environmental concerns linked to NFTs should be resolved this year or 2022 at the latest. If that’s still not good enough for you, it’s possible to mint ‘environmentally friendly’ NFTs today. You probably didn’t hear those statements coming from the anti-NFT police; after all it doesn’t fit the narrative. The single source of all of this alarm appears to be from cryptoart.wtf… it’s virtually the only reference cited in every article that I’ve read, and on the rare occasion there is a second reference, their vicarious outrage stems from cryptoart.wtf. Wtf? Having spent some significant time in academia, this kind of intellectual rigour would’ve got me kicked out before the end of freshers week. The cryptoart.wtf site has since been taken down and the author even admitting to intentional bias and significant inaccuracies with the calculations. Wt actual f? Just by zooming out for a moment and thinking logically about the figures, the calculations are clearly flawed. Even examination of the lowest estimations doesn’t hold up under scrutiny: three months worth of electricity for a household is, what, £300 ($400) absolute minimum? The fee that you pay the miner for the creation of your NFT, called gas, is usually somewhere between £5 - £50, but the higher figures are purely down to recent congestion in the system and paying more prioritises your transaction in the queue. Before the current bull market started at the end of 2020, I understand that £5- £10 was the norm. I’d love it if my household electricity bill cost me anywhere between £20 - £200 per annum. Perhaps the more sensible explanation for the cryptoart.wft figures are that the miners are, in fact philanthropist fairies and will perhaps soon offer to pay for your household electricity too?

Fog and tree.jpg

Let's look at the reasons why NFTs are cleaning up their act. The huge majority of NFTs run on a network called Ethereum, the second largest cryptocurrency behind Bitcoin. Calling it a currency is a little misleading as it’s really a ‘smart contract’ network. As already noted, you can programme the tokens to represent virtually anything, either digital or physical. Ethereum has also firmly set its sights on becoming the base-layer of an improved decentralised un-mutable internet, but that discussion is for another day. As it stands the network uses an energy-intensive system called Proof of Work (PoW) to verify transactions but, as mentioned, this will be upgrading to a system that is 99.98% more efficient, called Proof of Stake (PoS). Whilst some have criticised that this transition has been promised for years, the PoS beacon chain was finally launched in Dec 20 and is currently undergoing the rigorous testing needing before it can be unleashed upon the masses. The completion of this upgrade is under competitive pressure from other PoS smart contract platforms such as Cardano, Polkadot and others. Ethereum has the advantage of being the first mover in the game, with it being the leading fully operational network, whilst the others mentioned are nearing completion in the coming months. This competition can only be a good thing for the end user and the environment, as it incentivises rapid innovation within the space. It also gives us a choice of which network to use to mint our NFTs. Double win.

Another important step forward for Ethereum is the reduction of gas fees from Layer 2 scaling. The Ethereum network is Layer 1, the base layer, with apps being built on Layer 2. It's the same idea as IP / HTTP / DNS being some of the base protocols for the internet, and Google or Facebook the applications functioning on top of them. These Layer 2 apps are starting to be launched today, with Immutable X being the first, and many more due to arrive by the Summer. These apps reduce the cost associated with minting NFTs to pennies. This will also guarantee those cryptoart.wtf figures continue to look completely and utterly ridiculous. 

A common counter-argument for the adoption of NFTs today is that they are ‘environmentally damaging’ right now, and that when the network is running on PoS they will be given the moral green light. Again, we need to make our own choices here, and I’ll examine the PoW power consumption discussion in more depth below. However, if I told you there would be a totally green solution to flying within a year or two (there isn’t), would you stop taking flights until then? A tiny minority might, but the huge majority already have indelible blood on their hands. Why is catching a plane, having gold jewellery, upgrading your phone or playing computer games not garnering such collective fury? Whilst clearly employing a heavy dash of ‘whataboutery’ here, I think context is everything for these discussions as the concepts and figures being banded around are either too abstract to quantify (serious question - is a ton of CO2 a lot or not?), demonstrably false or both. That, and it’s convenient to ignore the ecologically damaging activities that we all willingly engage in, but choose to attack the pursuits of others that we don’t wish to understand. As a photographer, the chemicals used in developing film are horrendous for the environment, as are the processes involved in the construction of a digital camera. The bitter pill we all need to swallow is that Humans are bad for the World, and there’s a good chance we’ll end up wiping ourselves out. Personally, I feel comforted by the knowledge that the Earth will survive our malignant growth long after we, as a species, are gone. Until then, collectively we can and will improve. We have no choice.

Tree.jpg

Further dung flung at the current NFT mania has been that it is some kind of hyper-capitalism vehicle. There is no doubt in my mind that $69M paid for the Beeple piece is a smidge over it’s market value. We are definitely in the midst of a shit-art bubble, but there’s always been more bad art than good out there, and that will never change simply because we all have such varied palates. The hyper-capitalism argument falls short when you understand that the prices in crypto go down as well as up… and when I say down, the Ethereum price (relative to fiat currency) tanked 94% from the peak of the last bull market. Make hay whilst the sun shines. I actually like the idea that your work varies in fiat price depending on where you are in the crypto seasons. It challenges ideas of ‘worth’ as it’s such a contrarian system to the one we are used to. It also means you can grab a bargain in the crypto ‘Winters’. Further it makes a mockery of the notion that NFTs are just one big money launderette. Great way to store your ill-gotten gains if this time next year it’s worth 90% less than today. Why on earth you’d convert your untraceable fiat into crypto to store it on a public ledger that is visible forever is beyond me too. I can see in the early days of crypto it would’ve been an appealing proposition, but the modern-day on-chain analytics on display to the World and his Wife truly make it a low bar IQ test for naughty people. 

Before I wrap up this discussion I want to dig a little deeper into the power consumption alarm surrounding the crypto space. NFTs will soon be gleefully skipping away from this arena, and many other tokens do not employ PoW, so really we’re talking about Bitcoin (BTC). The first thing to mention is if you don’t get why we need Bitcoin then you’re unlikely to ever change your mind. All I can say is that the inflationary financial model that we use has been keeping you and I ‘poor’ and increasing the wealth divide for decades. More importantly the money supply in many countries have taken a deeply concerning acceleration since the start of the pandemic. I discussed this in more depth in a previous blog post, but I’ll reiterate the energy expenditure considerations here. The BTC miners need to find the cheapest current available on the planet to make the process viable, and are in a unique position to place themselves in the most remote locations on the planet in order to do so. They utilise the energy that is stranded and / or wasted simply because electricity doesn’t travel well. With this in mind, the power stations that provide you and I with our electricity need to over-produce energy or we would experience black-outs on a regular basis. Again, in step those miners to siphon off the excesses that would previously have been squandered. You won’t read this in any mainstream media articles as they need to pluck at your anger to sell you their angle. The misinformation being passed on as facts are a journalistic tragicomedy, but I suppose they need to punt their slant out before the daily deadline closes. I’ll say it again, I’ve been researching this stuff for months and I’m only just getting to grips with a small fraction of the projects and concepts out there. Regrettably, this fear mongering has been repeatedly regurgitated for years, with claims such as Bitcoin mining will consume all of the Worlds power by 2020. Right-oh! Bitcoins power hungry nature is its worst trait, of that there is no doubt, but the picture is far more nuanced than the headlines will have you believe. With that being said, these articles will help drive a positive change in the industry and some believe that BTC will expedite the adoption of renewables Worldwide. When, not if, BTC goes all in on green (because it bloody has to, there is no choice), there will be no conceivable reason left to not get involved… unless you prefer the current inflationary fiat system. I foresee in the near future a start-up (“Green Mining Co” anyone?) gaining traction, selling their freshly mined grass-fed BTC directly to niche customers at a premium price. This in turn will lead to copycats with the process growing exponentially driving one corner of a greener market. Just yesterday, Joe Biden announced positive steps towards carbon-free power creation, which further underscores the obligation of miners to fall in line, and soon.

Whilst I understand that there is a sliver of optimistic rune-reading here, the anti-crypto brigade more than counterbalance these prophecies with their blinkered negativity. Of course, there is a chance that none of this may come to pass… good ideas don’t always stick, and some of the damage caused by the crytoart.wtf genie cannot be put back in the bottle. It is pretty much all speculation atm as the tech is in its infancy, and that is part of the risk you take if you choose to get involved. If you ignore what is being said on both sides of the argument, and take a look at the rails being built by some of the biggest players in the game, that should tell you all you need to know about the likely future of cryptocurrencies and NFTs. Should you decide to punt for one NFT platform like Rarible, the next Instagram may turn out to be OpenSea. It’s the Dot.com-era all over again. For now I’m sat on the sidelines, chucking popcorn down my oesophagus like I’m at the flicks watching Thriller… but I don’t think it’ll be long before I FOMO on in.
Life as a Fine Art Photographer - The first 6 months

There can only be one start to this piece, and that is to state how ridiculously privileged I feel to have the life I do. Without a doubt I am living my dream, and I’m guessing if you’re reading this, it is likely to be one of your dreams too. I’ve received so many kind messages of support and encouragement upon taking the hugely exciting, but frankly terrifying the step into freelance work. A fair few people have also expressed to me that they hope to do the same one day. And good on ‘em. There’s a massive sense of freedom when you work for yourself. You get to apply your creative ideas and watch them grow, with no-one else to veto those moves. However the reality, for me at least, has been far from a bed of roses, and the motivation for doing this very open and personal blog is to hopefully give you some sort of benchmark and advice if a similar move is on your career roadmap. 

In the years leading up to this point, I would constantly ask myself, how will I know when I’m ready? Bryan Schutmaat has talked of the ‘snowball effect’ of time in the game, and despite having 11 years of obsessive photographic practice under my belt, I was still far from the point at which I felt I was ready. The leap of faith for me was precipitated by re-locating from Northampton to Torquay without specifically having jobs to move for. Six months in, I still feel that I am another 5 or 10 years or so of hard graft away from my snowball being anywhere big enough to do this as a job… so until then I need to keep on rolling or risk melting into the ground. 

Magnolia.jpg

Like many artists I don’t have a business head stuck on my shoulders, so when watching YT video after YT video about how to set up a business, one of the key questions that kept on coming up was, how do you set yourself apart? What is your niche that will make others part with their hard-earned for your services? Post pandemic, I suspect more and more people will look to monetise their talents, in search of the elusive ‘better way’; some because they’ve had time to reflect on the direction of their life, and others out of sheer necessity. But here’s the thing: there is SO much talent out there! The internet has accelerated our connectivity but also our influence on each other. I increasingly see a more homogenised photographic ‘look’ when I scroll through my Insta feed. Years ago, Street Photography was the genre du jour for the masses, but even street stalwarts such as Matt Stuart have begun to photograph people-less scenes with more regularity. Have a look at his #nothingfromnowhere series on IG, no doubt a future book in the making. The hard truth is, in photographic circles at least, the ‘overlooked’ or ‘neglected’ is perhaps becoming a cliche… which in turn makes it tougher to make a dime from photographing a slab of banality.

The honesty is going to get a little more raw from here, but when stuff needs to be said… 

Here it is: there is absolutely no way I could’ve sustained myself, let alone my family, solely on the fine art photography income thus far. Admittedly, more than stubbornly, I was fixated to pursue the purely ‘artistic’ side of photographic practice, rather than venture down the commercial route. The vast majority of professional fine art photographers do so using commercial work as the backbone of their income. Only the superstar ‘household’ names in the game can truly earn enough by doing what they love, but even they have augmented incomes from University lecturing and eye-wateringly expensive workshops. 

I realised that setting up the business during the pandemic was always going to be a tough gig, but as a family, we’d planned for years to get to this point so the ship had already left the port. I firmly believe things are likely to get tougher for us all yet, which in essence, was the subject of my last blog. The only way I have managed to make this happen so far, is to continue my nursing work in the NHS two days per week, invest time and effort into gaining passive income streams and, above all, have without doubt the most supportive wife on the planet. We essentially live off her wages and, as she also works in the NHS, we’ve both had to make huge sacrifices for me to follow my dream. I’ll say it again, I am truly privileged to be doing what I’m doing. 

Canvas.jpg

During the last six months, it has been a rollercoaster consisting largely of highs, but there have been unexpected lows to contend with too. The feeling of packaging up my zine or signing the back of a print to post around the world have been the sparkling highlights for me. It’s during these moments where I feel like I’ve ‘made it’. Here I am, doing the job that I’ve yearned after for close to a decade, with people willing to shell out their precious dollars for my art. It’s an incredible feeling. However, it would be remiss of me to not mention the feelings of insecurity, even worthlessness creeping in at times, despite the fact that I consider myself to have a very resilient brain forged in the fires of the NHS. I’ve already mentioned the jaw-dropping skills of other artists in the Instagram community. What gives me the right to charge what I do for my prints, when I see hugely talented folk selling theirs for a fraction of the price? All I can think is that they don’t need to make any living wage from their endeavours as they must be selling at near cost price for the print materials alone. Tax, gear upgrades, insurance, pension payments… these are all expenses that I haven’t even priced into my work thus far. This is a message for you all - if you ever have aspirations of doing photography as a job, you need to consider how you’re pricing your work today. If your fans and collectors are used to paying £30, £40, £50 for a print, why would they pay 5x or 10x that in a years time when you decide to make a go of it? Bottom line: all of our work is worth more than we are selling it for, of that I can be certain. Here is a stark warning that I too need to heed - by charging low prices for our creativity, we are devaluing the photographic ecosystem for us all.

Finally, despite how one might imagine, the actual time spent photographing hasn’t gone up since turning professional. I work office hours during the week on the business side of things, but I think I’ve only ventured out three times in the last six months to take any photos during these hours. The day-to-day reality is taken up writing this blog, optimising SEO for my website, sequencing / designing / packaging and posting zines or searching for hours on various hard drives to fish for images for an interview or feature. The photography still takes place late on a Friday night or early on a Sunday morning, same as it’s ever been. 

I’m genuinely sorry if this comes across as a bit of a depressing read. The very last thing I want this blog to do is to discourage you from following your passion. I need to end on conveying how happy, lucky, fortunate I feel to do what I do. I could’ve showered this text with the superlatives of the life I now lead… and, truly, I’m pinching myself on a daily basis. I just wanted to show that it’s perhaps not the skip in the park you might think it is. Despite this, am I worried? Am I feck! We’ve got this, and I’m excited to continue navigating the ups and downs over the next few years… after all, for me at least, a rollercoaster is a better existence than flatlining. My brother, who has been freelance for years, said there’s a common acceptance amongst the creative community that you don’t make any money for the first two years. If that’s the case, I’m doing just fine. 

You need to know this about Bitcoin

This will be my first, and probably last, non-photography related blog. I’m doing this because I’m frankly a little scared. I’m sacred about what is going to happen in the coming months and years, post pandemic. Now, most of you reading this don’t know me personally, but I want you to understand that I consider myself to be kind, socially-minded and ecologically conscious. Further, I do everything I can to avoid living my life in fear. During the pandemic my wife, young family and I used the time to concentrate on the beauty of nature and our surroundings, and we chose to focus on nurturing each other, rather than be fearful of what was going on outside of our control. As a family unit, it was the best year of our collective lives to date.

Despite this aversion to fear, what specifically am I scared of? In a word, hyperinflation. I am not and never have been strongly motivated by money. It’s just a tool to allow us to buy a loaf of bread without bartering. However, I think there is a good chance the price of that loaf will soon spiral out of control, and I’m far from alone with this belief. Why do I think this may happen? From our old pal Wikipedia, hyperinflation “…occurs when there is a continuing (and often accelerating) rapid increase in the amount of money that is not supported by a corresponding growth in the output of goods and services.”

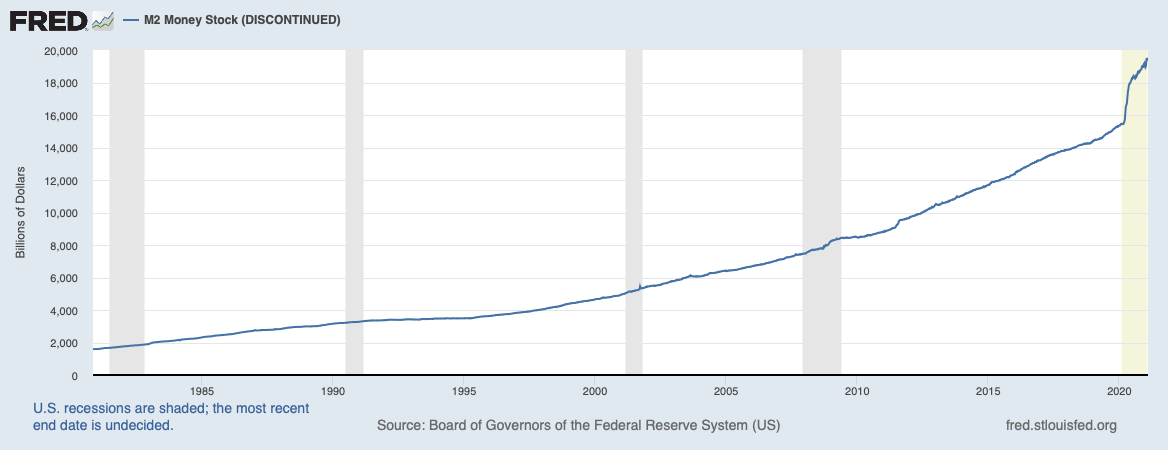
Here is a graph of the money supply of the dollar. This is important to us all as the dollar is the global reserve currency of the World, and the Pound, the Euro etc. are all being ‘over-printed' as well, a process innocuously called Quantitative Easing. This is to relief-fund the pandemic whilst simultaneously making the value of that increasing debt to be worth less. Of course it also means that your unit of currency buys less than it did a year ago. Inflation has always been built in to our current economic system, just never at these extreme levels. 

fredgraph.png

On then to the second part of hyperinflation: low growth in the output of goods. You don’t need me to tell you what’s happening around you. The closure of shops, restaurants, hotels and so on, isn’t exactly providing a fertile ground upon which to stimulate the economy. Many businesses have either already folded or are at breaking-point, so the very real possibility of mass-unemployment looms. Without those tax revenues coming in, how can governments continue to support their populace? People need to eat after all. The option they seem to have plumped for is to print more money and extend furlough in the UK, or dish out stimulus cheques in the US. Its a vicious positive-feedback loop. 

This is where Bitcoin and other cryptocurrencies offer a potential lifeboat to this situation. I’ve near-enough locked myself in a room for the last few months gathering as much information as I can, and the aim of this blog is to distil and share with you what I’ve found. If you didn’t get a chance to read my last blog (where I explained how this crypto currency journey all started for me), I’ll regurgitate and tweak some of the text from there. 

There will only ever be 21 million BTC minted with most of them already in circulation (18M). It simply cannot be inflated, unlike any other store of value, such as gold. Bitcoin has been the best performing asset over the last decade, and despite the volatility, has given investors an average of 200% compounded returns every year. Compare that with your bank account returns of 0.01%.

The underlying tech at the core of Bitcoin is called the blockchain. The blockchain is a decentralised (i.e not owned by one person or company) ledger of transactions that is maintained by a network of computers around the world. The most important aspect of the blockchain is that it is irrefutable and unchangeable, in other words it can be ultimately trusted. As we know, trust can be in limited supply these days. 

To put it bluntly, blockchain technology is going to change the World, in the same way that the internet did in the 90s. It will likely form the base layer of an upgraded internet, as discussed here. The tech will revolutionise everything, from authenticating ownership of property, music and art to improving the quality of your YouTube videos. It will even provide a solution to eradicating fake news and deep-fake videos. With the different protocols exploding like the Dot-com era, there will be 1000s of use-cases that haven’t been dreamt of yet. We will probably be voting on the blockchain in a future election, which would reveal the incontestable results instantaneously. Sorry ‘bout that Mr Trump.

Zoltan knows…

Zoltan knows…

Despite the huge potential we have at our disposal, there is A LOT of what is called FUD (fear, uncertainty and doubt) surrounding the space. But ask yourself why? Why are there calls that Bitcoin is a ‘scam’? Or that it ‘has no real value’. The Pound, Dollar, Euro etc (collectively called fiat currencies) have no intrinsic value either. Currencies used to be backed by gold reserves, but Nixon put an end to that in the 70s. That fiat can be printed ad infinitum is the biggest scam of them all. If you want to label something a Ponzi scheme, look no further than fiat, the inflationary racket that helps keep you and I ‘poor’. We get wage increases below the rate of that inflation, and are encouraged to take on debt, but because we’re charged interest on subsequent purchases, this makes buying those things more expensive. We’re being fleeced from both sizes. 

Banks hate Bitcoin as its decentralised nature is a threat to their very existence. But for the first time, every day more and more banks, and financial behemoths such as Paypal, Visa and MasterCard are getting into crypto… because they have to be, or be left behind. If you look past all the FUD, and concentrate on where the big money is flowing, you’ll see the mega rich understand that the fiat system has been milked dry, so they’re moving some, if not all of their wealth into Bitcoin. Citibank have just released a report that state it is at the tipping point of going mainstream, and it may well be how international trade is settled in the near future. The times, they are a-changing. 

So there must be a downside, right? The only stain on the playbook that I can see is the amount of power consumption that it uses to maintain the blockchain ledger. I consider us to be a green minded family and I want to hand over my little corner of this beautiful planet to my children in the same condition that I was born into. What’s more, there are some eye-watering figures associated with Bitcoin power consumption, but when delving deeper than the mainstream media headlines, you will find that it’s a more nuanced picture than first appears. Life is so rarely black and white, despite the polarisation of opinions in vogue today, and to write off Bitcoin because it uses a lot of power is an opinion I find somewhat hypocritical. The internet is estimated to use 3-6% of the Worlds power. The fact you’re reading this, means that you’re complicit in this excruciating energy expenditure. Given that Bitcoin and the blockchain will likely form the backbone of an upgraded internet, this gives it some context that is, for me at least, morally palatable. Just the electronic devices left on standby in America alone, uses about twice the power of Bitcoin mining in the same timeframe. How’s that for a shocking headline?

Power stations need to overproduce power otherwise we’d be getting power cuts on a daily basis. Just like my dog, electricity doesn’t travel well, so in an effort to get the cheapest current around, miners commonly position themselves close to power stations in order to siphon off any excess power that would otherwise be wasted. In many cases, the Bitcoin mining set-ups use renewable energy sources (up to 74% of mining) as it’s often cheaper to produce than fossil fuels. A possible silver lining is that there is a cash-rich incentive to improve the adoption of renewables, which has, and should continue to accelerate innovation in the field. It’s worth mentioning that Greenpeace UK have been accepting BTC donations since 2014, and when questioned about Bitcoin, their head of IT, Andrew Hatton, stated the larger issue at hand is that “we’re largely powering 21st-century technology with 19th-century energy sources.”

So, if you think there’s any validity to my beliefs and concerns, I’ll outline a few more thoughts and links to resources to help you get started. If you still think Bitcoin should be renamed Bitcon, or that you think our economy will snap back to normal service without a bump in the road, then I thank you for reading this far! Sorry if you feel I wasted your time.

If you’re still here and want to bag some Bitcoin, you’ll first need to download a crypto wallet. There are hundreds out there, and Coinbase is the largest, I believe. I personally use the Crypto.com app as you buy the coins at market price and it’s a super simple app to use. I’ll state now, these are all my opinions, I haven’t been paid to recommend any of this, its just what I use… and I am not a financial advisor and none of this is financial advice. Can’t sue me now, so there!

Everyday is a lottery

Everyday is a lottery

Once we’d invested our ‘rainy day fund’ into crypto (which has tripled in value in 3 months), we now use a method called ‘dollar cost averaging’. Basically, if you have £50 or £100 left over at the end of the month, just invest it rather than buying another piece of crap you don’t need. At the time of writing, £100 would get you 0.0025 BTC. It doesn’t sound like a lot, but 1 BTC can be divided into 100 million Satoshis, its smallest unit of the currency. If you re-frame your £100 purchase as 250 000 Satoshis, it might make you feel a little better. If hyperinflation kicks in, those 250 000 Satoshis are soon going to look like a very wise investment indeed.

It’s important to understand that the ride isn’t actually as easy as you might think. With the volatility of the infant industry, you are put through he psychological wringer. Your funds can drop by 20, 30 even 40% overnight, although this volatility is reducing as the market matures, and with it, so are the returns. You’ll need strong hands and ignore the instinctive urge to sell when the price drops… in fact, when others are panicking, you’ll have to be more logical than Spock as that’s the best time to buy. Conversely, ignore the emotional urge to buy when the price is rocketing up by $1000s per day and ‘buy the dip’. Most importantly, only ever invest what you can afford to lose, as there will likely be a crash in prices at some point in late 2021 or early 2022. This is because the crypto price waves in cycles… I’ll link to some resources below that explain this further. My personal belief is that we may see a big drop when (if) BTC hits $100K as it will be a target for a lot of people and they’ll take profit around that point. I also think there will be a second higher peak in the weeks and months following that, but, as my crystal ball is broken at the moment, this is just one mans opinion!

I apologise if all this sounds like one big sales pitch for cryptocurrencies, but it angers me to see all the uninformed opinions being repeated in parrot fashion without people having the first idea what they’re commenting about. The world economy is in a very fragile state indeed and I feel compelled to stick my neck on the line for this one. I understand that my business may be damaged by expressing these views, but I implore you to take this seriously, do some proper research (which probably means avoiding the hysteria of the mainstream media) and don’t automatically right off BTC and blockchain technology ‘because it uses a lot of power’. In recent years, we as a populace have a worrying tendency to regard things as black and white, them and us, but in truth, life is an infinite shade of grey. Maybe I’m mad, and hopefully I’m wrong, but if there’s a chance that I am right, then I believe investing a little in Bitcoin or other cryptocurrencies is an insurance policy against decades of irresponsible government policy. 

Please share if you feel that your friends and family need to see this information. 


Resources:

This is the most simple explanation of the Bitcoin mining and the blockchain that I have found.

This chap could well sell you your next used car, but here he explains what you need to do to buy crypto.

Ben Cowen is the person whose opinion I trust most in crypto. His analysis is based on maths, probability and is a much needed voice of pragmatism in the space. This collaboration Ben posted recently is an excellent explanation on the cyclical nature of Bitcoin and how to manage your crypto investments.

TMI is another honest source who brings you the news as it happens, but is peppered with his extensive knowledge, analysis and humour. 

If you are still unsure of the ethics of cryptocurrencies, here is a piece on how they could help African nations and their citizens claw their way out of poverty.

Peace and Love to you all,

Andy

What has Bitcoin got to do with photography (Part 1)?

I’m sure you’ve all heard of it. Some of you may even own some. We’ll get to answering the question (it’s not clickbait, I promise!), however there’s quite a steep learning curve to even begin understanding the tech behind Bitcoin and the cryptocurrency space, so it needs a little introduction. Here goes…

My first real exposure to the potential of the notorious cryptocurrency started in the summer of 2020. I had opened a Revolut account to get cheap Euros and the company began offering the purchase (custody, not true ownership) of some top cryptocurrencies… so I popped £50 in and forgot about it. Fast-forward to November 2020 and when I looked again, that £50 was now £100. The money had doubled in less than 6 months. This set me off on a frenzy of information gathering (which I’m still doing), but the thing that really got me hooked on the concept was that Paypal was about to do the same thing, i.e. offer crypto to their 346 million users in early 2021. Frankly, this made the lightbulb in my head shine so bright that it singed my nasal hair. In news hot off the press, they are also soon to offer taking payments in cryptocurrencies to sellers using the service. That is certainly interesting to me as a photographer that regularly receives monies via Paypal. Nevertheless, this isn’t the intended answer to the initial question I posed… more on that later.

After discussing what I’d found with Mrs F, we decided to roll the dice and pop in our ‘rainy day fund’ into Bitcoin, just under £3K. This time it took exactly 7 weeks to double. Just read that last sentence again. I should at this point say I am not a gambler. Impulsive maybe, but I just don’t do gambling. This was the video that really got me convinced, and having disappeared down the rabbit hole, I’m now so certain that this is the future of money, that I don’t really use my bank account any more. I have Paypal, Revolut and my Crypto.com wallet, alongside my traditional bank account… guess which one has the least funds in? 

Let’s face it, governments and banks are, ahem, fucking it up. Money printing is taking place at an unprecedented rate, and the crunch is only going to get more severe post-pandemic. I read this week that we may have 0% interest rate very soon in the UK and some banks are even beginning to charge negative interest to their customers… that’s right, you’ll pay money to the bank for holding your savings, that is concurrently falling in value in real terms. Bitcoin provides an elegant solution, as there will only ever be 21 million BTC minted (currently 18M in circulation, but 4-6M of those are lost forever because of poor sods like this). It simply cannot be inflated, unlike any other store of value, such as gold.

Bitcoin.jpg

The underlying tech at the core of Bitcoin is called the blockchain. It is a decentralised ledger of transactions that is maintained by a network of computers around the world. The most important aspect of the blockchain is that it is irrefutable and unchangeable, in other words it can be ultimately trusted. Trust can be of limited supply these days, so that is a hugely valuable asset.

Despite this remarkable invention we have at our disposal, there is A LOT of what is called FUD (fear, uncertainty and doubt) surrounding the space. But ask yourself why? Why are there calls that Bitcoin is a ‘scam’? Or that it ‘has no real value’. The Pound, Dollar, Euro etc (collectively called fiat currencies) have no intrinsic value either. Currencies used to be back by gold reserves, but Nixon ended that in the 70s. That fiat can be printed ad infinitum is the biggest scam of them all. So your £, $, Euro or whatever is dropping in value every day, so some, myself included now, see Bitcoin as a hedge against inflation. Banks hate Bitcoin as its decentralised nature is a threat to their very existence. But for the first time, every day more and more banks, and financial behemoths such as Visa and MasterCard are getting into crypto… because they have to, or be left behind. 

Beware, there are a lot of sharks in these waters, including billionaires who have been actively pouring hate on cryptocurrencies, then as crypto is on the cusp of going mainstream, finally admitting that they’ve secretly been amassing large bags of the the stuff for the past few years. It makes me feel physically sick that people manipulate others for their own gain in such an orchestrated fashion.

So there must be a downside, right? The main characteristic that sits uneasily with me regarding Bitcoin is the amount of power consumption that it uses to maintain the blockchain ledger. Bitcoin mining set-ups often use renewable energy sources (over 75% of all mining operations) as it’s cheaper to produce than fossil fuels. Nonetheless, it is a stain on the playbook. The possible silver lining is that there is a cash-rich incentive to improve the adoption of renewables, which will hopefully simultaneously accelerate innovation in the field. We live in hope.

The other unexpected aspect that has been difficult to stomach is that the ride isn’t actually as easy as you might think. With the volatility of the infant industry, you can be put through he psychological wringer. Your funds can drop by 20 - 30% overnight, although this volatility is reducing as the market matures, and with it, so are the returns. You’ll need strong hands and ignore the instinctive urge to sell when the price drops… in fact, when others are panic-selling, you’ll have to be more logical than Spock, as that’s the best time to buy.

So finally, on to attempting to answer the original question. What has photography got to do with Bitcoin? There are hundreds, if not thousands, of alternative tokens (called altcoins) alongside Bitcoin. They all serve different functions, and this is where things start to get really complicated! The area that I hope is of interest to you are the NFT coins. NFT stands for Non-Fungible Tokens, and have the potential to revolutionise many sectors, including, you guessed it, the art market. 

Firstly, what are NFTs? If I borrow a tenner from you, I don’t pay you back with exactly the same note, so money is ‘fungible’, i.e. replaceable by an identical item. Non-Fungible Tokens are a way of irrefutably proving ownership of a unique or editioned item. Currently they are often linked to digital art and can be minted, sold and resold. As the NFT is a ‘programmable contract’ the artist can even specify that they receive a cut from any resale. Where I am currently exploring this application is to have an NFT minted of the digital photograph, but specify in the ‘smart contract’ that it comes with a print. Hey-presto, we have irrefutably solved the problems of counterfeit, ownership and copyright. These tokens can be coupled to any item that you can think of… festival tickets, clothing, digital music… anything! NFTs are at a very early stage in their development, so there is still a long way to go before we see mass adoption, but I for one am going to explore getting some of my work ‘minted’ into NFTs and blog about it here in the very near future.  

Until then, I’ll conclude by stating that I believe we are standing at the precipice of a huge technological leap forward into the unknown, akin to the birth of the internet. Sadly, we live a post-truth era, yet here we have a system that provides incontestable fact. An unbreakable trust. To me, that feels like something we corruptible humans need more than ever before and at the double. 

See you soon for part 2.

Shooting in Shockingly Bad Weather

Just a short blog this week as I’m busy, busy, busy atm, but I hope to provide a morsel of food for thought, even if I only mange to churn out a sentence or two :)

I’ve written before about different seasons, or times of day, and how they can drastically effect your opportunities of finding that elusive winner from the same environment. It’s what makes trudging the same spot over and over, year after year worthwhile. Where I feel I’ve found a real goldmine in recent times though, is from stepping out in inclement wet weather…. the more horrendous, the better. Even popping out for 15 mins, I always seem to come back with something that really resonates. Perhaps it’s the blend of surreal beauty combined with a metaphor for melancholy? The ups and downs of everyday life captured in a fraction of a  second. There is also the clear appeal of ensnaring scenes in weather conditions that most photographers steer well away from. Unusual is usually a good thing in photography after all. 

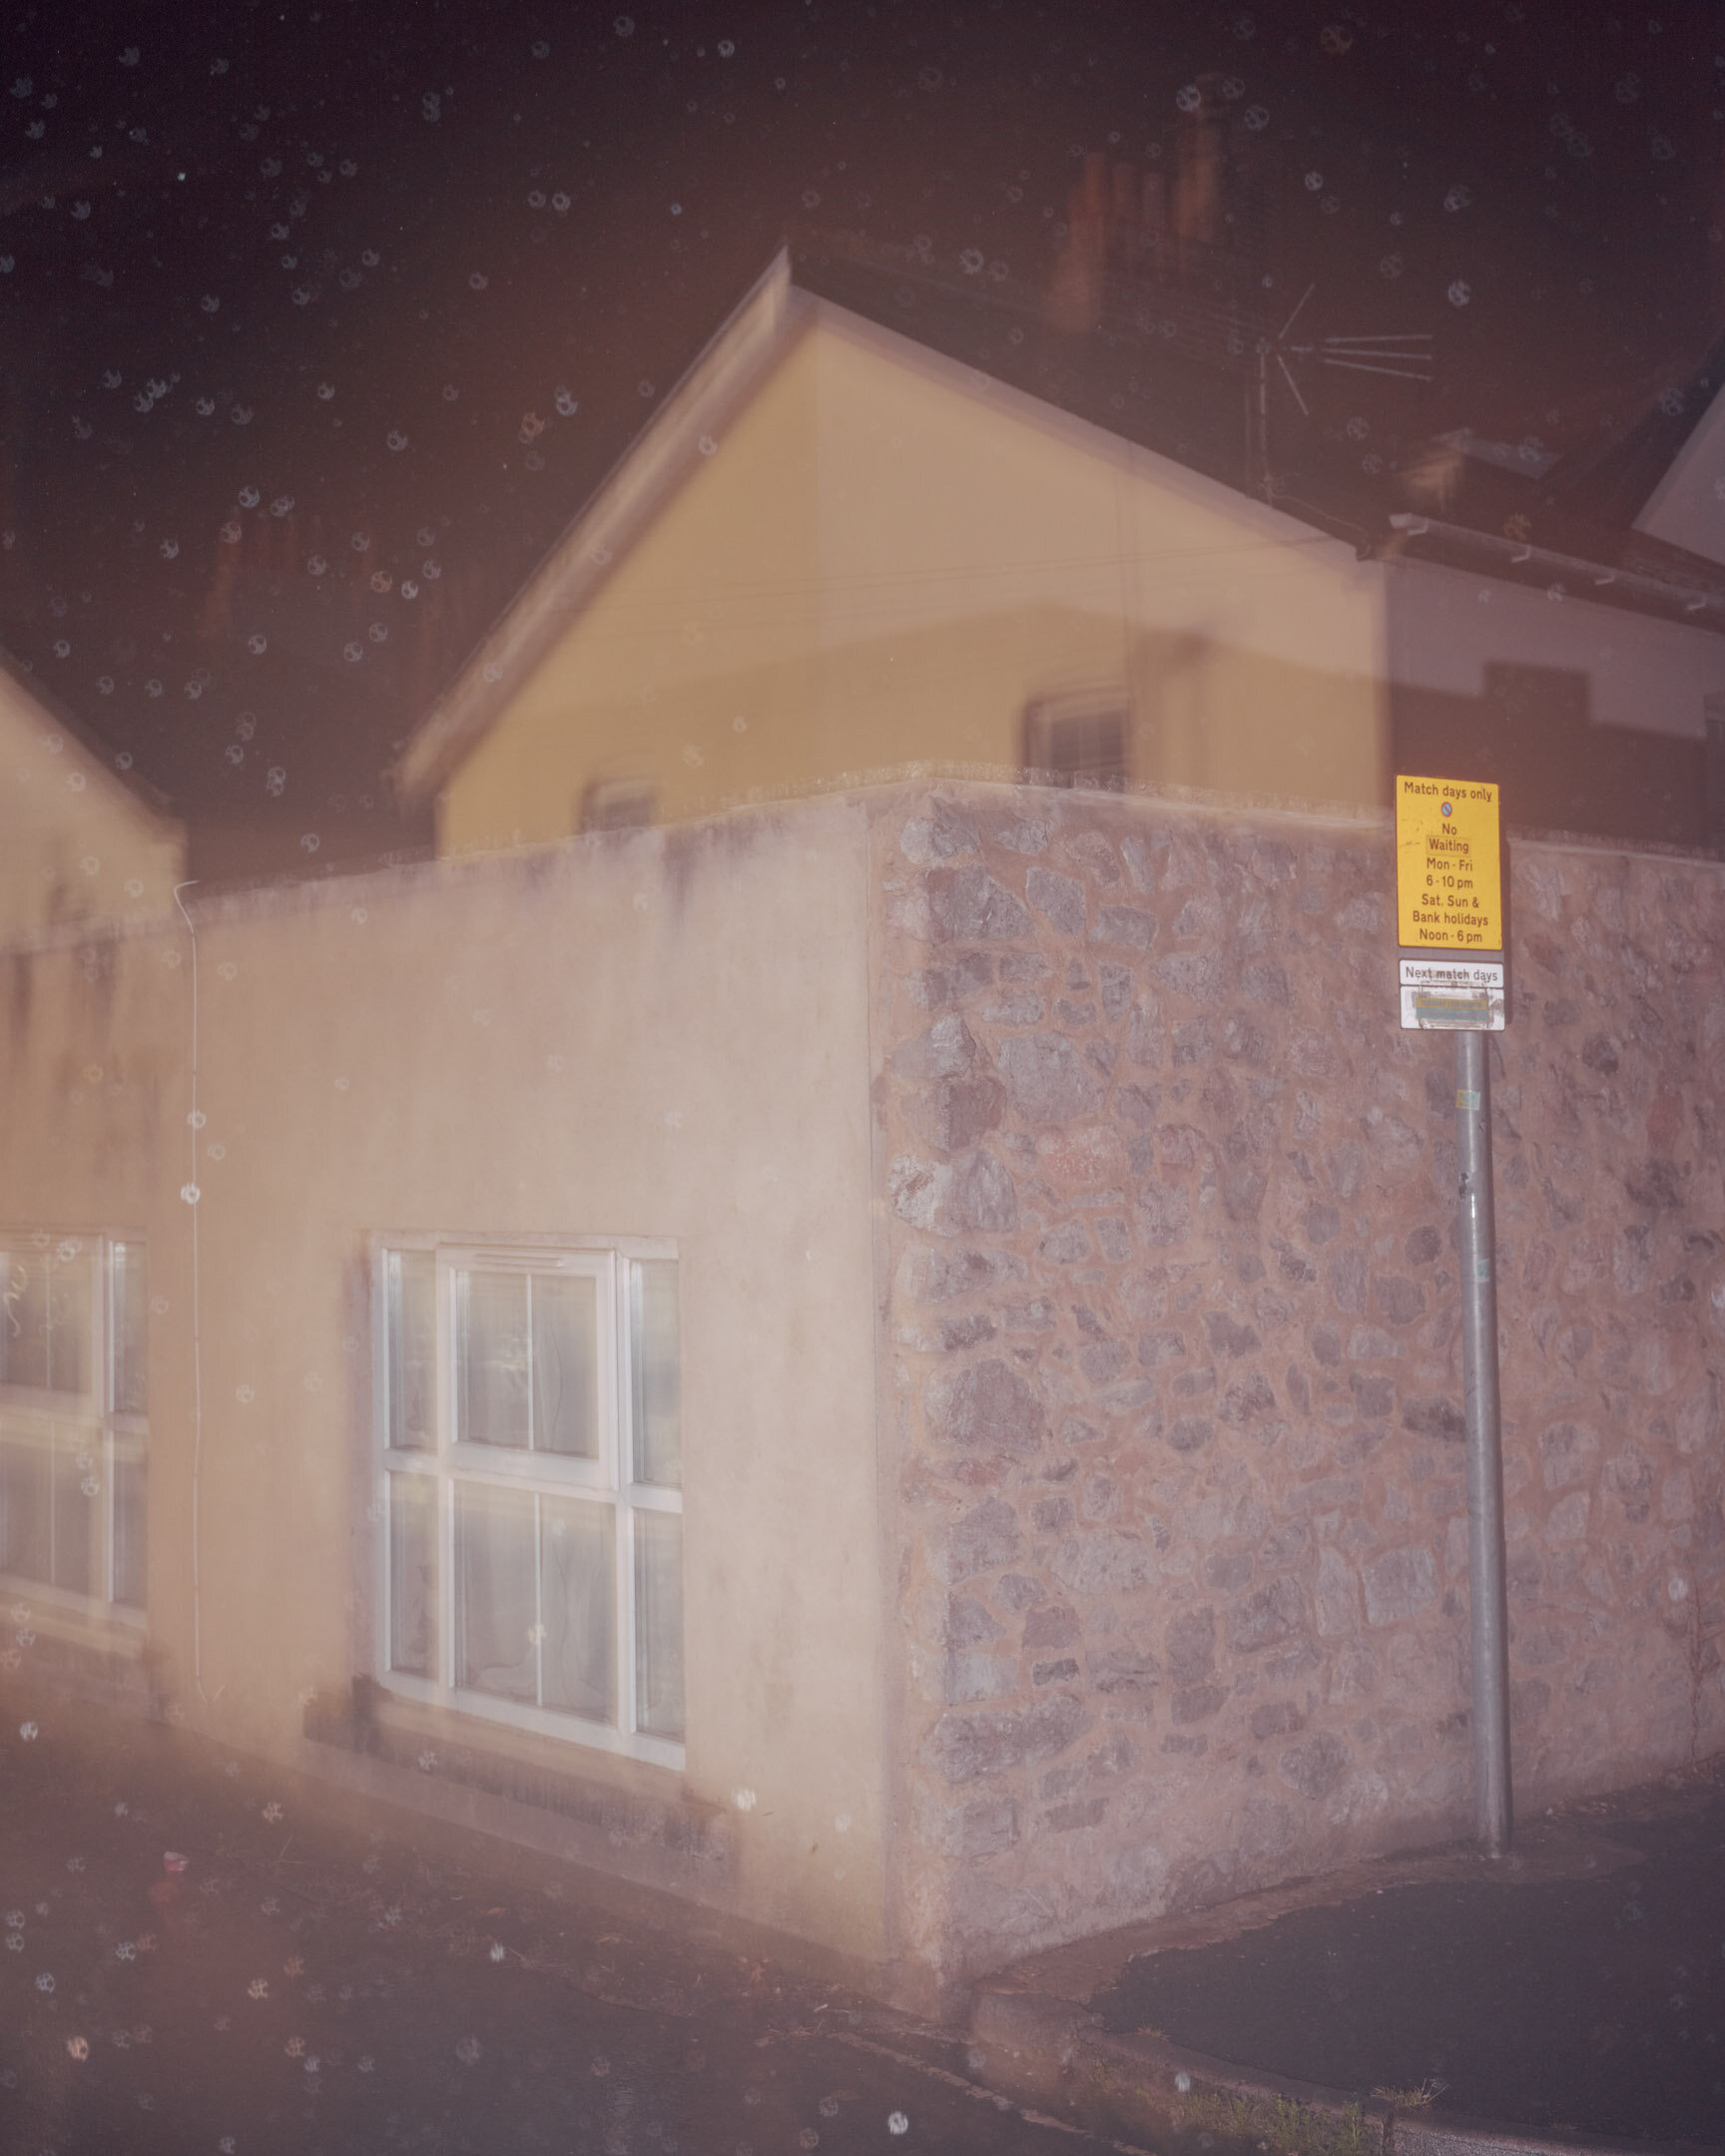
St Marychurch Road, Torquay… in the rain

St Marychurch Road, Torquay… in the rain

I’m now genuinely excited to see rain forecast when I have a planned shoot coming up. Part of the technique (or lack of) that I’m employing is to wander without a tripod at night, and let the flash freeze the raindrops and subject matter. It’s those static water droplets that, for me, really bring the fizz to the party. Recording what our eyes are unable to is what fascinates me most about this game. To think that those water drops will contain some H2O particles generated from peoples breath via intracellular reactions, it’s enough to make my mind pop. So let me take this opportunity to thank you for breathing, and subsequently contributing to the water cycle. And by all means please keep it up.

Fortune Way, Torquay… in the rain

Fortune Way, Torquay… in the rain

The key to avoiding it being the most deeply unpleasant outing ever is by wearing appropriate clothing, including your footwear. If you’re all waterproofed and cosied up in there, I find it’s actually rather enjoyable to trot out in the hammering rain. I feel a little like a child dancing in puddles, and thats a good headspace to be in when capturing the wonders of our everyday surroundings. Although I’m lucky that my camera AND lens is water resistant, my flash isn’t so I just pop a plastic bag over the whole lot and whip it off when I need to. Basic but effective. 

So next time the grey clouds roll in overhead, perhaps it could be time to grab your camera instead of making a hot chocolate. I’m confident you’ll be surprised at what you come back with. Just make sure you repair that hole in your shoe first, and have the hot chocolate and towel ready for when you get back.

Is New Topographics still relevant in 2020?

New Topographics: Photographs of a Man-Altered Landscape opened 45 years ago, at the International Museum of Photography at George Eastman House in Rochester, New York. The show, curated by William Jenkins, pieced together the work of 8 American, and two German photographers. The exhibition eschewed the romanticised ‘idyllic’ view of the landscape that had been the norm for art photography up until that point. Instead, with the exception of the Bechers, the collection drew together unremarkable scenes of everyday America in an attempt to redefine beauty. Such was the paradigm shift in the notion of what photography was, that the show was largely disparaged by the critics of the day. With the benefit of time, we now understand the seismic impact that NT had within the art world and those ripples continue to inspire new generations of photographers and other artists to this day. 45 years later, to what extent is New Topographics still relevant in 2020 and is it time for a change around here?

Before we attempt to wrestle with the debate, a little more from my perspective. The key word for me when describing the original exhibition and subsequent movement is ‘deadpan’. A blank, expressionless gaze at the unexceptional. Are we vacant because of the disillusionment? A disappointment with humanities irreversible impact on the environment? Perhaps, but that is for the viewer to decide as the NT lens continues to record a poker-faced view of the world as it is. The pregnant-pause of the NT glare challenges us to stop and examine what the familiar means to us. By withholding any judgement, the space is set for us to survey our own personal relationship with the world around us, as well as ruminate over the countless controlling forces that shape our society.

Robert Adams - Mobile Homes

Robert Adams - Mobile Homes

45 years later, can NT evolve to avoid stagnation? Perhaps after 45 years of an unresponsive stare, one could argue it is time for revolution. Indeed, individuals are beginning to produce heavily photoshopped montages of landscapes that don’t exist in reality, hanging the NT moniker on the work. Personally, I feel that Fake Topographics is a man-altered landscape gone too far. For me, the movement holds ethical hands with street photography. With the whole occupied world out there, surely there is more than ample material to capture without having to resort to make-believe? Having said that, I commend these efforts as simply the act of bringing ‘digital art’ into the niche field of NT re-tests its boundaries and challenges the status quo. 

Conversely, 45 years on, does NT even need to evolve? Whilst the underlying ethos remains constant, the accompanying body of work has to move forward simply because the landscape in front of the photographer moves forward with it. In this context, New Topographics is forever a crusade for our current time and place. Further, when viewed in retrospect the topographical studies arguably increase in significance. Not only do they take on historical value, they also reveal a continual state of flux and the simultaneous stasis of humanity.

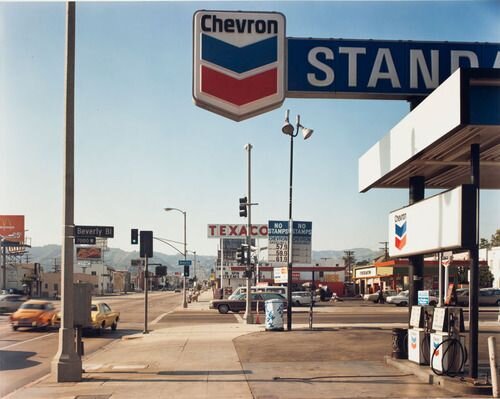
Stephen Shore - Beverly Boulevard and La Brea Avenue, Los Angeles, California,  June 21, 1975

Stephen Shore - Beverly Boulevard and La Brea Avenue, Los Angeles, California,
June 21, 1975

I’m fully aware, that I’m probably being a little crusty with these outmoded views. Life moves on after all. Perhaps thats my point though, and our self-appointed job is to document that very process. Who knows, maybe one day we could collate these banal observations into some sort of living archive of the entire world as we know it. Indexed and dated, all ready to show the aliens when they land :) In some regards, we already have this - just search #newtopographics on Instagram or Google images. But I’m thinking more. More resolution, bigger, better, conceivably even with 3D rendering. Imagine the lovechild of Minority Report and VR. Pop on the headset and there you are, staring up at Stephen Shores Chevron sign. A swipe of the hand and you’re stood looking at Mobile Homes taken by Robert Adams. I’m probably sliding down a slightly surreal rabbit hole right now, but then I started the discussion about the relevance of New Topographics in 2020. Now that we’ve got that one out of the way, I’m looking to preserve the movement for another 45 years.

Nighty night

This week we’re going to be looking at techniques to help you get to grips with capturing the compelling topographies of the night. Night photography must make up about 50% of my work, and with the evenings drawing in in the UK, this only increases as winter attempts to dominate. For a number of reasons, I think it’s an important avenue to explore, even if you don’t feel like it fits with any of your current output:

      • It offers a completely different playground, so an area that is sometimes forgettable in the daytime could be a bona fide bonanza of shapes and shadows as natural light falls and the artificial lamps fire up

      • It pushes the technical boundaries of your gear, so you’ll get a better understanding of light and how to record it

      • The night naturally imbues an offset atmosphere to your work that can be difficult to recreate in daylight.

      • Even if it’s not your thing aesthetic-wise, it could open the door for your creative kernels to start popping

      • Its just so damned peaceful, calming and therapeutic to wander the streets after dark and have the environment largely to yourself

Gear you need:

A tripod. A torch. A camera. If you’ve got all of those, what are you waiting for?

Ash Hill Road 7

Ash Hill Road 7

Getting started:

First and foremost, pick an area where you’ll feel safe. You want to focus on creating compelling work, not letting the fear take over. The more gritty areas can come later if you want them to. Are there any spaces you know that have particularly strong light? LED street lamps are popping up everywhere in the UK, and it makes for a beautiful, clean white illumination of everything underneath. Perhaps go for a drive at night to do a recce… just make sure you bring your camera in case inspiration decides to show its beautiful face. Todd Hido often drives for hours at night until he see’s something, but I’d strongly recommend once you’ve found an area you’ll feel safe in to leave the car and wander. You’ll miss stuff in the car. Promise. Early Sunday morning or Sunday at dusk is a great time to start. Fewer people and cars to disturb your rhythm and the exposure. 


Camera Settings:

I spent at least two or three years fighting the urge to get a tripod, in order to keep my set-up as portable as possible. When shooting at night, or in some derelict building, this meant I was taking shots with my aperture wide open at ISO 3200-6400. Let's just say every single image from those early days are unusable now. I look back and chuckle at my stubbornness. Learn from my mistakes and get yourself a sturdy tripod - I use a 3LT Winston, its a (lightweight) beast and has been a constant and reliable companion for 3 or 4 years now. Forget a new lens or a larger sensor, I genuinely believe that a tripod is the best bang for your buck in photography ;) 

Stentiford Hill Road

Stentiford Hill Road

Now you’re shooting atop a tripod, you can reduce your cameras ISO to its base setting. The difference is, errr, night and day. The shadow detail, the latitude, the dynamic range; prepare to be amazed. 30 seconds was the longest exposure I could record with my Pentax K1 or Nikon Df, apart from if I stepped into the random world of BULB. As my camera and handheld light meters wouldn’t work in such low light, BULB was essentially guesswork. The workaround is to bump up ISO and close the aperture down @ 30seconds until it meters, get your abacus out and calculate how long the exposure will be at the settings you want. I often feel the need to work more quickly than that, especially in residential areas, so max. 30 second exposures it was… and if needed I could up the ISO by a stop and / or open the aperture by a stop to increase the light hitting the sensor / film. Another hack if you’re more technically minded and in less of a rush than me, is the Ultimate Exposure Computer. Could work for you. 

Despite the above, a maximum shutter speed of 30 seconds @ f5.6 was usually enough to expose correctly, especially when you consider that the light meter is looking to capture enough light for 18% grey, or effectively, daytime. Therefore the meter will usually attempt to overexpose a night scene. This can lead to some delightfully surreal effects, so depending on what your creative intent is you can use this to your advantage. However, if you want to record the scene as your eye sees it, you might have to dial in a stop or two of exposure compensation.

In terms of the overall camera settings, I’d recommend shooting in Manual or Aperture priority at night, and as I’ve mentioned, base ISO. Those of you shooting film, I’d look up advice specific for you due to reciprocity failure. Manual focus saves possible frustration of hunting AF here too, but either way this is where the torch comes in handy!

Confrontation:

I’ve had a few people challenge me and, other than security guards, only ever at night. Perhaps it's because I’m taking longer to focus and expose the shot, whilst in the day 1/125 second is often all I need before I’m gone? My advice is smile, and be polite… you’re not doing anything wrong. Show them your Instagram feed. A business card goes a long way to legitimising what you are doing. I explain that I’m a fine art photographer and that whatever I’m pointing my camera at is beautiful, or bathed in gorgeous light. If that hasn’t scared them off already, the moment I thank them for keeping the place safe, they know they’re talking to a friend. Even security guards, no matter how gruffly they approach, if I’m on their territory, then I’m polite and move on… of course if they’re dishing out grief in a public space then thats a different matter altogether ;)

Abbey Park 5

Abbey Park 5

I think that about wraps up another blog, but if there’s any specific questions you have or any further advice you could share with others, then let me know in the comments below. Please bear in mind, with this and any of my blogs, this is only a recommendation from my perspective… get out there, use whatever gear you are motivated to use… phones, film, pinhole. Thats the joy of developing our own practice - we incorporate advice and influences that resonate, whilst discarding data that doesn’t, to enable us to continually hone our unique visual voice.

It’s good, isn’t it?

What’s the point of post processing?

I should apologise now. You’ve been used. Ruthlessly. 

I sincerely hope you’ll forgive me?

So I posted two versions of the same photograph in my Instagram feed and story this week, asking you lovely folk which one was your preference. The work is a key piece for me as it’s the first image you see when you land on my homepage. One rendering was post-processed how I normally would, the other with basically all settings reset - essentially the RAW file! Only I didn’t explain this when asking for your favourite, sorry - I just said in my story I was ‘trying out something new’. I stopped just shy of uploading the actual RAW file, I don’t even know why… maybe I’m not ready to face the world without make-up yet? 

In essence, I wanted to see if the processing was doing as much as I think it does, as I’m tickled pink when I receive positive feedback about the tones I eke out of my sensor. It’s a signature for my work, and therefore has enormous value to me. For clarity, the ever-evolving preset was developed a few years ago, and gets me 80% of the way there. My ‘post-preset processing’ is usually just a few further tweaks to the Basic Panel and HSL in Lightroom. Just by accident, I uploaded a batch of new images recently and didn’t apply the preset on import. What I found surprised me. There were a few RAW files that looked better (to me anyway) than when I’d intervened. I decided to investigate further by applying this wanton nihilism to one of my most colourful pieces.

To be honest I actually like the RAW file that came out. I mean I really like it, and faaaaar more than I thought I would. As I normally apply the preset whilst importing, I don’t even get to review the unadulterated capture. Well, maybe a fraction of a second whilst LR applies the processing, then pop, preset applied. Of late, I’ve been noticing this spit second of RAW file more, thinking I like those colours… pop, those vibrant colours vanish as my muted palette preset is applied. Time for a sea change perhaps?

So how did you all react to the question posed? Here’s the RAW (really, Mr Feltham?!) data:

Votes for usual ‘muted’ processing: 21

Votes for ‘no' processing: 10

I’m not actually surprised that the RAW file garnered a third of the vote, and some of those were from eyes I know and trust. I do really like it, but I prefer the muted version more (phew). A few people who voted for the muted version said they did so as it was more ‘me’. I kiss you. Oh, and just to show you how uncooked the ‘RAW' file was, here it is again versus the virgin file (just whites and highlights pulled back on the ‘processed’ version - everything else set to zero):

I’ve secretly been having fun with this idea all week. I’ve been posting at least one image per day with very little processing applied: only temperature balance corrections, and then an arbitrary limit of two sliders maximum. Two! Those were often increasing the luminance of key colours in an attempt to add a dash of effervescence. It is a RAW file after all. However, there’s been no sharpening, no attempt at eradicating the shadows or pushing the exposure, no desaturation and they’ve all been exported within the Adobe Color profile, not my beloved Adobe Neutral… and as for HSL, normally that’s the heartbeat of my colour profiling, with virtually all tones having tweaks applied. Two sliders!!

Torquay Road - Only two sliders away from the RAW file

Torquay Road - Only two sliders away from the RAW file

What’s take home from all of this? Well, above being a little light-hearted entertainment in an overly serious world, from now on I’ll not be so preset-precious. It’s an exercise that has made me think, and think hard… which, once the pain subsided, has tremendous value to me, and I hope some of that gain rubs off on to you. Post-processing can be one key component to clarifying your own photographic voice - if we all posted RAW files then the IG feed would become a more boring, homogenised place. Whilst I strongly believe it’s essential to get stuck in a groove, to have some sort of rhythm that underpins your practice, it’s also good to step outside our own echo-chambers once in a while, taking in a lungful of fresh unfiltered air. I feel better already.

Flash photography

For this weeks blog I want to explore the wonderful world of flash photography and encourage you all to get involved, if you aren’t already. If you’re anything like I was, you’ll have bought a flashgun around the time you got your latest camera because, well, you needed one in your arsenal. When it arrived you may have pointed it in auto mode at a loved one, given them eye burn, looked in misery at the resultant image and decided to leave it on the shelf to gather dust. I don’t really remember what changed or why, but suffice to say, I don’t ever take the thing off anymore. It’s been this way for two or three years now. Daytime, night-time, twilight… almost all conditions benefit from a little bit of extra light in my opinion. Put it this way, would you rather have more light  (where you want it) in your scene, or less when taking a photo?

Warberry Copse - would’ve been a very different shot without flash

Warberry Copse - would’ve been a very different shot without flash

So how do you actually get going using flash? My advice is to never use TTL or any auto functions. Annoyingly, my Godox V1 has a tendency to toggle from manual mode to TTL when I hold my face to the viewfinder. My face clearly needs altering in some way to prevent this… although that’s not a request. Anyroad, the point is that sometimes I accidentally take a TTL shot and it never ever ever turns out how I want it. Ever. Of course if you are shooting events or something of that ilk, then auto modes have their place, but in the context of fine art work, you will surely want total control to achieve your vision. The obvious advantage of placing your flash in manual mode is that you’ll very quickly learn what settings work, and when. As daunting as that may sound, it's actually ridiculously simple… at least the way I do it. Here’s my tried and tested *secret* method honed to perfection over the weeks, months and years:

    • If you’re pointing at something more than two or three meters away, night or day, put the flash on full power. Review the resulting image and if there’s any areas burnt out, turn it down a stop or two.

    • If you’re pointing at something less than two or three meters away, night or day, put the flash on ¼ power. Review the resulting image and if there’s any areas burnt out, turn it down a stop or two.

    • Thats it. I almost wish I was kidding.

Now that I’ve distilled the sum of my battle-ground tested knowledge of flash work into two bullet points, I think you owe it to yourself to give it a go. If you’re shooting with a large latitude film, such as Portra, you could probably apply the full power / quarter power method and get away with it, as the highlights will look after themselves… although this advice is dished out with a healthy slice of Caveat Emptor, as my love affair with film ended just before the flash obsession took hold. Whilst I’m being honest, I should say that I’ve moved on slightly from the bullet points above, and can usually tell what power to set the flash on depending on where my subject is in relation to me… but the above framework is most often where I start, as it just works. Which is jolly nice. 

Southampton 2 - flash bought some welcome illumination to a very grey day

Southampton 2 - flash bought some welcome illumination to a very grey day

That was the beginners tutorial, but here is how to level up with your flashing: As experience grows, I am getting better at working out how much I should underexpose the scene given that I’m adding extra light from the flash. Often though, it's a trial and error process. I’ll explain more: When shooting with flash there are two exposures to consider. Your flash exposure and the ambient light exposure (i.e the sunlight, streetlamps etc). In reality, I find this is more important when shooting indoors, especially at night… when outside, day or night, I find it doesn’t seem to make so much difference, so I often set the shutter speed as the meter suggests. To deal with indoor exposures very simply, I might underexpose the camera settings by one stop and let the flash add in the rest of the light. However sometimes to get the creative effects I want, I’ll need to take a few shots to get the subject and then the surroundings correctly exposed. First alter the flash settings until the subject is lit as you want from the flash. Once you have this dialled in, don’t alter the flash settings. Next look at the ambient lighting in that image and work out if you want to lighten this (in which case increase the exposure by a stop) or darken the surroundings (you guessed it, decrease exposure by a stop). Review this image and see if you need to increase / decrease ambient exposure, or if it’s just right, in which case Goldilocks will be delighted with you. Keep going until you have your mini Gregory Crewdson masterpiece on your SD card. Extrapolating this process further, you can play endlessly with the possibility of using multiple light sources, and therefore multiple exposures, to set correctly before you create the image you have in your head. It’s one way to achieve a more cinematic feel to your work; after all, part of the ‘cinematic look’ is through the use of multiple light sources, each adding to the visual complexity of the scene… just like they do in the movies. 

Ash Hill Road 6 - it took multiple attempts to dial in the correct flash followed by ambient exposure

Ash Hill Road 6 - it took multiple attempts to dial in the correct flash followed by ambient exposure

I get a lot of commentary about how insanely powerful the flash I use is, with one comedic soul suggesting that I must be carrying sports stadium floodlights in my pocket. Although I’d dearly love this to be true, I’m about to debunk that theory once and for all :) Here is the flash gear I use: 

    • Mostly a Godox V1 on camera

    • Godox AD200 with H200R round head attachment and EC200 extension lead with X1 trigger

More power is always welcome, and this is particularly true in the daytime. Often, I find I don’t need the power of the AD200 at night and prefer the portability of the V1. I also get locked into rhythms with my photography, so a while ago I’d be using the AD200 for almost everything, but I’m deep in the V1 groove currently, so there. Having said that, there is a look that I can achieve with the AD200, that I can’t with the V1. It just looks more polished somehow, more radiant. Just more. But it’s also more to carry and more involved. Sometimes less is more (no more mores).

I hope this has been helpful and inspired some of you to dust off your flash. It opens up a whole new world of creative possibilities that, in reality, I’m only just starting to delve into. When you look at portrait or product photographers, they really go to town with their lighting and equipment… but why shouldn’t the banal be given as much attentiveness and be lit like a supermodel?

Tips:

    • When buying a flash go for much power as you can afford in the form factor that works for you

    • Go for a flash with a tilt / swivel head so you can bounce the flash off walls to give a softer feel to the light

    • Consider having the option of off camera flash as it adds a *lot* to your lighting options

    • Work in M mode, always… its easier than you think

Good luck with your flashing folks!

Sensors - size matters?

I remember it well. The niggling feeling at the back of my mind that there’s a whole fleet of cameras with bigger, badder sensors out there, and if I had just one of those beasties in my hands, I’d magically be able to make better work. Sound familiar? The itch was so severe that I’ve moved from 1/1.63” (LX5), to Micro 4/3 (Olympus Pen), APS-C (X100, X-Pro1), Full Frame (Nikon Df, Pentax K1) and reaching the final destination of Medium Format (GFX50R)… albeit mini-MF when compared to film sizes. This week let's consider this desire and examine the value attached to going bigger… or, for that matter, smaller. Does it actually, truly, make much difference?

Babbacombe Downs 4

Babbacombe Downs 4

I’m going to level with you: I’m not the most technically minded person, so if you want a maths lecture, you’ll need to go elsewhere. Furthermore, this is far from the first time this question has been looked at… there are so many comparisons, often with examples, which I won’t be doing here. It’s a reasonable argument that they will do a much better job than me of reaching a valuable conclusion for you. So why am I even bothering to add to the din? My problem with the big photography review websites, that ‘leave no stone unturned’, is that they often try to consider every aspect from every photographic perspective… sports, wildlife, landscape shooting, video, the lot. All have very different needs but none of them seem to truly align with mine. I’m guessing as you’re here, then your work might have similar requirements to my output. Most importantly, the (sometimes) rigorous testing might scrutinise test-charts under controlled lighting or a portrait that takes into account the differences in focal length equivalency. What they rarely do to my satisfaction is consider the topic, any topic for that matter, in real-world applications. We learn to love, loathe, or something in-between, a lens or camera by day-to-day usage, over a period of time. So that’s what you’ll get from me here, a more subjective analysis based on my long-term experience with each format. 

As with many things in life, when we think of a singular topic in photography they cannot be considered in isolation. There are a number of variables related to sensor size that can all impact on the final image output - resolution, equivalence, sensor generation, mirrorless vs DSLR, SNR, pixel density… the list goes on. To level some of this playing field a little, I’ve noted in recent years that the rate of sensor advances has slowed significantly. When I first set off on my photographic journey over a decade ago, each generation of chip would leap-frog the previous cohort with a notably sizeable increase in ISO performance, resolution, SNR and the rest. In more recent times, camera manufacturers have even taken to releasing an upgraded model with the exact same sensor on board. The net effect of all of the above is that it’s nigh on impossible to get an absolute answer to the original question… but let's make a stab at it. Everyone loves a stabber trier.

Saunton Sands 1

Saunton Sands 1

With all these variables at play, it is important for me to define my subjectivity further. I almost always shoot at base ISO, 99 times out of 100. If you regularly shoot in the upper limits of your ISO, this discussion probably won’t help you much :(  In truth, I have no idea what my GFX50R is like at ISO 3200 or even 1600… genuinely, I’ve never gone there. Until recently, I would always shoot on a tripod, but I’m still working at base ISO when handheld, even at night. This means I have a good understanding what each sensor is like with ideal settings, but have no idea how they perform if stressed a little, at least at the time the image is captured. This last disclaimer is because I regularly push my images by 2 or 3 stops in post-production. In that regard I’m very demanding of a clean RAW file to tinker with. If these are the kind of parameters that you work in, then this deliberation is more likely to be of value to you. 

By now I can hear you out there saying, ‘Get to the point Mr Feltham, no more blah blah…’ So, first key question: Have I noticed improvements with every sensor size increase? Yes. Yes, I have. If thats what you wanted to read to encourage you to fork out for the next step up, then great. Enjoy your new camera :) Of course more needs to be said here. Resolution has limited the size I could print my work in the past, so that is one reason why I moved on from the Nikon Df (16MP) to the Pentax K1 (36MP). I reviewed some Df images recently, and there was some noise visible in the shadows at base ISO. This is something I haven’t noticed in K1 or GFX files. Manufactured by Sony, they performed miracles with the 36MP chip… it actually seems to bend the laws of physics. That the higher resolution sensor produces cleaner files than a 16MP chip is magic indeed. The high-res sensor was originally released in 2012 (!!) in the D800. Game. Changer. On reflection, it was for me as well, as the Pentax K1 was the point at which the resulting RAW files cleared the ‘good enough’ bar, and by some margin. However it must be stated that it was the increased resolution and performance, as well as the size, that had a part to play here. 

I suspect there will be a number of you lusting after the Medium Format GFX sensor, so want some kind of analysis as to the value that this increase provided. There was a clear improvement over the K1 - and a big improvement when compared to the Df. I would estimate I get about a stop extra of dynamic range when comparing the GFX with the K1. I get similar to the GFX output when employing pixel-shift (4 exposures combined) in the Pentax, but there are limitations to using this function. Lots of folk have mentioned the ‘creaminess’ that I get from the GFX output and I see it too… I think what’s being observed is an increase in the total amount of light (and therefore colour) recorded by the larger sensor, and probably an extra boost from the larger individual pixel wells. I must admit that this is the point at which I’m crashing into the ceiling of my physics knowledge, and with some force. Nonetheless I can confidently estimate I was also getting about a stop advantage every time I moved up through the other formats, M4/3 > APS-C > FF. If you’ve moved up through the ranks, has this been your experience too? More importantly, do you think it’s been worthwhile?

Abbey Park 4

Abbey Park 4

Drawing the discussion to the close, the GFX system is a steep price to pay if you consider you can get a refurbished Pentax K1 or D810 for well under £1000… and take home 95% of the image quality. If you’re on a budget (who isn’t?), this is absolutely where I’d recommend you put your hard-earned cash. You’ll get a cleaner final image when compared to the smaller formats but for a similar price-point. However, I don’t regret buying the medium format rig as I push my files so much in post-production. Because of this, to put it simply, I can create work that I couldn’t with any other gear. If you don’t push your files as aggressively as me, I’d recommend the FF high resolution options if you want large prints. Even taking equivalence into account, FF will also offer faster glass, so if you desire shallow DOF portraits this is again probably the most fruitful path to take. Your pressure points will likely be different to mine, so as always in photography, you have to distill your needs and balance that with what you want / can afford / get approval from significant others without divorce. Although as I’m sure we all recognise, sometimes it's not just about need, is it?

Photographic Technique - And an attempt to unlearn it

This weeks blog is a musing on formal photographic technique, how far it can take us, and thoughts on breaking free from its shackles. By writing the last statement, I’m making it sound like we’re a prisoner in our own art form. But are we? Am I? Are you?

I’ve always felt the chafe from the of the Rule of Thirds noose, and it has taken years of conscious effort to feel like I’m beginning to loosen the rope. In an effort to accelerate this process, I’ve taken to eschewing my tripod when I venture out at night. Sometimes. Having been a vociferous convert to tripod use at all times of the day for at least the last 5 or 6 years, this was a big deal for me. Actually, it was a huge psychological barrier to overcome as I unclipped the safety net. Despite the crisp, detailed images that a tripod guarantees, there is without doubt, a loss of spontaneity in their usage. I was reflecting with a friend recently that if I take several shots of a subject, it’s almost always the first version that I end up using… raw intuition has a part to play in the feeling permeating through a photograph. Eggleston will tell you a thing or two about that. 

My Instagram post on Monday was a comparison of two takes of the same scene (see above), first on a tripod, the second handheld. Of course, being that they are taken at different times of night and with it raining in the handheld version, the light captured is very different. I also used my torch to add a little cheeky ruddiness to the tripodded (is that a word?) version. Many would say I’m comparing apples to oranges, but nonetheless they’re both fruit and you can prefer one over the other. The more formal tripod version received the overwhelming vote. We could critique the choice of Insta as a place to receive quality assessment of the work, but it provides a snapshot of opinion and what’s more, there’s allegedly no smoke without fire. In an attempt to make an objective evaluation, it probably is the ‘better' image - the composition is more taught, the colours draw the viewer in with a satisfying contrast of red and blue, and the autumnal bloom of the feral foliage is pleasing. Despite this, I can’t help but feel the rawness of the handheld version more. The static orbs of rain, the ghostly movement of light from the window. It is, in a sense, more real due to its imperfections. Life is imperfect. Perhaps this subjective reading is a commentary of where my head is currently? Is it even possible to be entirely objective about one’s own output? Coming back to work months or years down the line certainly helps remove the associated baggage of what you were thinking or feeling when pressing the shutter. If you don’t have the luxury of time however, the only other option is to seek external opinion, especially valuable from those eyes you trust. 

Other photographs that I have taken sans tripod often speak to me on a more personal level, but invariably garners less attention than my more technically focussed output on Instagram. Is this the platforms failings to communicate subtlety via a phone screen? Perhaps without tripod, I’m making work that isn’t objectively as good, but it feels like progress as its something different for me? Instagram isn’t going to shape my output consciously, I’m too pig-headed for that. Over time however, would I abandon the experimentation as subconsciously I react to the gentle implication that the work isn’t as good when I go off piste? Another way to slice it, is that it’s different to what I’ve done for years, and therefore the viewer would rather I stuck to the familiar. If Radiohead released a homage to Chas ’n’ Dave, I suspect it wouldn’t fair so well.

Somewhere in Torquay (Handheld)

Somewhere in Torquay (Handheld)

Has any of this resonated with your experience? I realise that this weeks blog considers a lot of questions about my own practice, but I can’t be alone here, can I? It probably raises too many queries without bringing many answers. Perhaps over time the solutions will naturally reveal themselves. Either way, as an artist, it is bloody essential to experiment, even if a foray into the unknown ultimately ends in failure. Something along the way is bound to stick, and (thankfully) usually, little is lost en route. One thing I do know for sure, and that is The Formal Book of Photographic Rules is one that has stuck around me like a lingering fart. To achieve the looseness of a legendary blues great, you either hone your craft with dedication over the decades, or sell your soul to the Devil. As I’ve not received the invite from him yet, it appears that it’s the long game for me… and I’m okay with that. In fact, I’m only just getting started.

Self-publishing a Zine: Part 2 - Getting the finished product into your hands… and other peoples.

You’re on version 35 of your zine, and you finally think it might just about be okay enough (you’re your harshest critic, remember?) to release on the unsuspecting pubic. There are so very many options with regards to getting your zine printed, so how does one possibly choose? I was, in a way, lucky that the zine was a lockdown project and as a result my depth and field of view for my printer search was narrowed to 200mm at f2 (apologies) on micro 4/3s (genuinely sorry). A local printers would definitely have been my preference, having wanted to talk to someone in person about various options (such as fold out pages) and their associated costs. Alas, in April 2020 this wasn’t happening, so online I trotted with my crusade. 

Even if supporting local business was off the table, there are still a fair number of online printers who all have a plethora of options to bring your project to life. I ordered some paper samples from a few that inspired confidence and quickly opted for premium weight paper with a natural finish. For the cover I wanted matt laminated for durability and a professional look, again with the heaviest weight paper available. As this was a stake in the mud for my ‘brand’, I wanted it to be the best it could be, whilst maintaining an affordable price-point. 

I’ve mentioned before in these pages that I’m impatient at the best of times, so convenience was king when deciding which printers to go for. This is where I think I made my first mis-step, but park that statement for a moment. The UK based company, Mixam, has a wonderfully simple interface where you can input different variables to your hearts content, and the resulting price alters as you explore your options. The Trustpilot reviews were overwhelmingly positive and I liked the paper samples so we had found a winner, ladies and gentlemen. 

Ash Hill Road 2

Ash Hill Road 2

Following the PDF upload instructions on the website was painless and I received an instantaneous proof copy to check over, as well as a nice little digital flick book of the publication as well. I was given an estimated 10 day wait, but they managed to beat that by 3 days. Top marks Mixam. My delivery came in 3 boxes; excitement levels soared through the roof and into the stratosphere as I opened the first one. I had it in my hands. The cover looked and felt great, as did the 200gsm natural paper. However, the digital inkjet printing was, well, less great. A zine, by definition is a little handmade, a tad rough and ready… photocopies or newspaper printing are not uncommon. But… but… the work was shot on digital medium format. The images have a contrast, tonal range and depth that was somewhat lost through the digital printing process. I went to great lengths to craft each image with portable studio lighting, painstakingly designing and sequencing the zine with constant refinement of the project with each review, and opting for premium weight papers that kept my profit down but the quality high. The last step, my choice of print technique turned out to be, for me at least, the weak link in the system. When it comes to image making, I am a self-confessed perfectionist, as I’m sure many of you are. Perhaps my ‘good enough’ bar may be set too high? Nonetheless, next time, and every time, I’m going for the lithographic option. I’ll need to order more (or pay more per copy) but for me, I feel that it’ll be worth it. Most importantly, I want people who buy my zines to feel that too. 

Ash Hill Road 4

Ash Hill Road 4

For a print run of 100 copies, Mixam only offered digital printing. The litho printer kicked in at 350 copies and this seemed far too many. To be honest, I genuinely didn’t think I’d sell 100 copies, but more on that later. If I had my time again, I’d have ordered a number of sample prints of my own work, which is a service that Mixam and others offer. That way I could compare print quality and make a more informed decision. In fairness to Mixam, the natural papers that I chose were supposed to result in a lower contrast print. I should probably up the contrast of the images before exporting the PDF and organising samples would’ve given me this feedback. Alas, it just wasn’t possible for this venture. For a number of reasons I was against the clock with this publication, so unfortunately had a narrow timeframe in which to get ordering. I won’t be making that mistake again. 

So how did I market the project and actually sell the zine? It was quite rough and ready, in true zine fashion. I simply announced the imminent arrival in an Instagram post, and requested that people DM me if anyone wanted one. I then gave out my PayPal details and that was it. I was flabbergasted by the response. ½ of the copies were gone within 24 hours and only 7 left after a second post the next day. What a huge honour it was to feel that, and I’m certain that if you are an active member in your chosen social media outlet(s), you’ll feel the love too.

OK, time to talk dirty… I know how you like that. Here’s what the project cost and how much net income I received:

Cost for 100 copies: 

Outlay: £253 (56 pages, A5, 250gsm uncoated and 350gsm silk matt laminated covers) plus £10 postage

Cost of 125 A5 hardback envelopes: £12

Total: £275

I charged £10 for the zine (plus postage) and 25 were not for sale:

  • 10 copies for family members

  • 10 as ‘thank yous’ - I asked a number of trusted eyes to critique the zine before sending to print - a highly recommended part of the process as I made a number of changes from this

  • 5 in case any got lost in the post - and all of these went!

75 x £2.75 = £206.25

£750 (75 sold @ £10) - £206.25 = £543.75 profit, although the final total was less than that due to zines lost en route, not charging enough for postage in some cases etc.

Ash Hill Road 5

Ash Hill Road 5

What do you think of all that? I know some of my thoughts may sound negative, and I hope if you’re reading this and bought a copy that you don’t feel like you received a sub-standard product. I was, and importantly, continue to be genuinely happy with the zine. What’s more, I received a lot of really heart-warming messages from people who bought the book. I even had repeat custom from someone who bought it as a present then wanted to keep it, and someone else wanting one after they’d seen their friends copy, by which time they’d all sold out. In fact I’ve examined zines from other artists that I’ve supported, and those that are inkjet printed don’t bother me in the slightest! The negativity stems from being a perfectionist with my own output and I guess I’m swallowing the bitter pill of my own advice by being my harshest critic. On occasion, it can be tough gig when you put yourself out there, releasing work that runs emotionally deep yet feels like whatever you produce is never quite good enough. 

Perhaps this blog has turned into a bit of an autopsy, but like I said before, I’m doing it so that you don’t need to make the same mistakes I did. The very last thing I want to do is discourage you from producing your own zine. It was a fabulous journey of learning and creativity, and a voyage I shall certainly be going on again. If you receive samples of inkjet printing and it works for you, great! It's by far the most economically viable option available, and perhaps closer in nature to the original spirit of the hallowed hand-crafted zine. Most of all, the joy of seeing your photographic endeavours permanently forged into something you can touch, feel and share with others… that is up there with some of the greatest thrills I’ve experienced on this photographic rollercoaster, and I want to stay on for another ride - I hope you decide to hop on too. 

Self-publishing a Zine: Part 1 - Desk Top Publishing

It’s been a while. Far too long in fact. I sincerely hope you’re all keeping your head above the water during these crazy times?! From my perspective, I’m delighted to say that things are changing around here. Now that I’ve officially set up my photographic business I intend to publish thoughts here more regularly. Let's start with a weekly post, with a Friday deadline and see how we go. Who’s in?

Over the next couple of weeks I’m going to walk you through my experience of producing and self-publishing a zine, so that you don’t make the mistakes that I did… unless you want to of course. I suspect if you’re reading this then you’re probably thinking about producing one too? There’s likely all manner of thoughts going through your head right now: Will anyone buy it? Am I good enough to do this? Do I have the correct skill set to self-publish? What should I have for lunch? These uncertainties and more fired though my brain before setting sail with the project. All I can say is go for it… zines are red-hot at the moment, and for good reason. It’s a beautifully authentic way to drag your work from the throw-away world of social media, to craft something permanent, something real, something tangible. Stepping into the unknown will always bring with it a level of fear, but from my experience, that is also the magical space in which the good stuff happens. 

From the soaring heights of conquering your fears to the bumpy landing of dry logistics, part one is going to be about choosing and using a desktop publisher. The closest experience of using any publishing software I have to date is a rudimentary grasp of those word-processing stalwarts, Word and Pages. Would these negligible skills be transferrable to make the leap up to DTP?

Hope’s Nose

Hope’s Nose

You don’t need me to tell you that YouTube means that learning virtually anything is possible these days, so off the bat I scanned various videos from folk who have made zines in the past. Adobe InDesign, it seems, is the publishing industry standard, but like Lightroom and Photoshop, is offered on a subscription basis. Adobe charge £20 per month for the pleasure, but have a thrifty option which would be to get everything ready and plump for a weeks free trial instead. The problem there was that if I wanted to do a zine again (newsflash: I do) then I’d have to cough up the pennies. If it was a large part of my job to publish content, it might be something I’d consider as there’s endless tutorials about every aspect of the programme available online. But when I already fork out £10 pm to Adobe for LR/PS, waving goodbye to an extra £20 sounded expensive. Turns out it was.

A quick search around the subject and a few reviews later and I was downloading Affinity Publisher for a fraction of the price. I was super-lucky with my timing as they were running a 50% sale over the summer so picked up the app for the princely sum of £23. That’s not per month, that’s a one off payment. I understand ‘no-brainer’ is the colloquial term to apply here. Even at full price (£49), it soon pays for itself when compared with the Adobe option, and I only scratched the surface of what was possible within the programme when putting together the zine. One happy customer. 

In terms of using Affinity, I found it to be relatively intuitive even for a technological luddite such as myself. There were only a couple of times when I got to the effing and jeffing stages of frustration - something which happens on a minute by minute basis if I ever dare delve into Photoshop. Thats the real reason I don’t digitally manipulate my work (joke). For the most part, I was good to go after skimming through a 30 minute tutorial on AP (thank you Rachel). Please believe me when I say that if I was competent with the basics after half an hour, then you will be too. 

Anstey’s Cove

Anstey’s Cove

Starting out with a new project was ultra simple. Clicking File > New brings up a host of standard options. I’d already decided that I wanted the zine to be A5, so the dimensions were inputted automatically. You then need to choose the number of pages you envisage (I ended up adding more) remembering to work in multiples of four. Work in the CMYK colour space and don’t forget to include a bleed (3mm in every direction, as instructed by my printers).

When designing the zine, I just copied and pasted once I’d used the ‘Place Image Tool’ on the first page as I wanted most of the images to be of the same size and position throughout. If you opt for a beautiful full page spread, the image should also go beyond the page edges, up to the bleed borders. Thankfully the programme 'snaps’ these into place as you drag the image placement window to fit. For the cover design, I had opted to play with the title of the zine, You R Here (see image below) and include a pin. Again, this was straightforward to do and similar to how you’d create a shape in Word or Pages. For the colour scheme, I just played around with contrasting tones from a Wes Andersonesque palette. The yellow colour I used was ‘mustard’ and you can input the standardised ‘Colour Co-ordinates’ which were easy to Google. The dusty pink colour was one that I’d settled on from tickling sliders within the app. 

My only criticism of the programme so far is that it would be great to include a ‘create spine’ button within your document, rather than having to start a separate document and generate one yourself. In terms of the thickness required for the spine (if you are getting your zine perfect bound), it depends on the number of pages and the thickness of paper you choose, but again your printers will be able to help you here. 

On to one of the most exciting parts of the entire process: selecting and sequencing your work. You may already have a project that you wish to publish, and however dreadful this sounds you’ll surely have to ‘kill your babies' in due course, or some of them at least. Be your harshest critic. I started by throwing a load of possibles into a folder then from that pool worked out which ones were the must-haves. For me, it's important to have quieter moments in the sequence; I’m just not sure you can have a book full of belters. Think of it like music, even the most banging tracks have a rise and fall. The great thing about a photobook is that it doesn’t need to be all of your best shots ever. There will be images that you’ve taken that really speak to you, but perhaps wouldn’t be ‘enough’ to stand alone as an Instagram post. Those are the photographs that are given space to breathe in a zine, and it’s wonderful to be able to give them life outside of your hard drive. 

The next step is where your creativity really comes to the fore - the actual sequencing and pairing of photographs. Whilst in all honesty, this is where it can make or break the zine (no pressure), the good news is that you already have the visual skills required, given that you are a photographer. Don’t get me wrong, there are some who seem to have an instinctive, preternatural gift in this department (Tyrone Williams and Isa Gelb come to mind), however I’ve definitely felt a significant improvement with practice, and you will too. 

Some tips to help if you feel a little lost about joining up the dots: look for repeating colours, compositional shapes (including negative space), motifs and, importantly, feeling within the work. Often subtlety is key here, rewarding repeat viewings for the reader, but also consider having some pairings more apparent than others. To practice, try sequencing a carousel post on Instagram if you haven’t already. Pair up some from your archives, then come back to it later. Does it still work? Look to other photobooks and zines for inspiration - in terms of the progression of the story, which ones are your favourites and why? Sequencing and design go hand-in-hand so it’s worth contemplating different sizing of the images, some full bleed, images on both pages in some cases and not others, landscape mixed with portrait… the list goes on. All / some / none of these things can add to the rhythm of the collection when done correctly. I highly recommend this 10 minute lecture for a great analysis of some masterful sequencing. Thank you Tia.

If you’re still frustrated, take your time. Being a perfectionist isn’t a bad trait as a photographer! Weeks and months will yield results as you practice your sequencing more, and perhaps even provide you with the final image that ties the whole concept together (as Robin Friend found with his breathtaking monograph Bastard Countryside). Throughout this process, never lose sight of the overarching narrative of the piece. A story needs a beginning, middle and an end, and your zine should be no different. 

To wind things up for this week, I should mention that I was on (I think) version 16 before sending the PDF to the printers. I would export the sequence thinking it’s a wrap, sleep on it, only to then have an uneasy feeling in the morning that three or four images were not quite sitting right. Infuriating, yes, but let's be honest here, what would be the point of it all if it were easy?

Next week I’ll be discussing the printing of the zine, and how I marketed the project, with details of what it cost me in time and money. Stay tuned :)

Addendum - I have been so impressed with Affinity Publisher that I’m seriously considering giving Affinity Photo a go. I really don’t want to keep squandering £120 per year on LR and PS when I don’t even use PS. I’m freelance now, so every single penny is counted, recounted and then totted up again. If Affinity Photo was still at its sale price I’d have bitten already. Maybe it’s time for a trial? Rest assured, if I make the switch, you’ll hear about how the two applications compare here. If anyone has any experience of the app, or want to share their experience of producing a zine, it would be great to hear in the comments below.

Fujifilm GFX 50R - A Fine Art Photographers Real World Review

I’ve been so happy with my Pentax K1 for 2 ½ years. Nothing that been released since has really turned my head (err, much)… The fantastic IQ, the “Three Princesses” lenses, pixel shift. What more could a photographer want?

If truth be told, absolutely nothing. 

I think we’ve triple-jumped over the ‘good enough’ line in digital a few years ago, even if you have exceedingly high demands from your system. The advent of the Sony A7Riii and D850 were arguably the first ‘do it all’ cameras - but who actually needs a camera that does it all? Maybe you do, but I certainly don’t.

So why-oh-why did I drop 4 grand on a camera, when I was so happy with what I’ve got? It’s one of those questions that is difficult to answer but perhaps easy to understand. Head vs heart, the head is still reeling from sizeable can of whoop-ass that the heart opened on him. 

Blackpool 16

Blackpool 16

The moment the GFX 50S was launched a couple of years ago, I started mentally totalling up the used prices of my gear to see if the system was in reach. The writing was already on the wall. When the first images of the 50R started to appear, I knew this would be a better fit for me; it was significantly cheaper, had a smaller form-factor and the 45mm (35mm equivalent) had been released with stellar reviews. Although I didn’t NEED it, I wanted it like a 40 year old virgin wants to sow their proverbials.

The final nail in the coffin for the K1 (although I am keeping it for its flexibility), was the 2 years interest free credit offered by WEX. Medium format digital was finally within my grasp.

Palma’s 2

Palma’s 2

So the biggest and most obvious question: how does it actually stack up against full frame? The first time I imported the files onto the iMac there was more than a little trepidation… was I soon to suffer from an acute onset of buyers remorse?

In a word, no.

My jaw was firmly on the floor. Superglued even. The fidelity, the textures, the sheer exquisite detail… breathtaking. That the sensor captures this much information in a fraction of a second blew my tiny mind. This is a serious bit of kit. More serious than Garth Crooks.

By sheer luck, I had a photographic weekend in Blackpool lined up a week after the GFX had landed - what better way to put the camera through its paces. Morning, noon and night for a full weekend with some talented photographer buddies. The images here are the resulting photographs from that jaunt.

Blackpool 12

Blackpool 12

I know I shouldn’t do it to myself, but I find myself lurking on DPReview more often than I care to admit. There is a night scene comparison on there between the Nikon Z1 (same sensor as the D850) and the 50R with 45mm. You have to look really hard to see the differences between the two comparison images, and that’s enough for many of the FF faithful that the ‘old’ 44x33mm Sony sensor in the GFX (and others) is well past it. Case closed. In fact in typical DPR measurebating fashion, there is a chorus of complaints that the Fuji doesn’t even have a MF sensor… it’s just a tiny bit larger than FF, so they say. The FF’ers never even cared when digital MF was away from the collective conscious of the mass market, but now that Fuji have a MF system that is essentially affordable to that market, their ‘superiority’ (I hate that word, especially in photography) is under threat. And, again in typical DPR fashion, they ain’t going down without a whinge!  So the FF’ers loved those comparison images. Two pictures later and they can all sleep easy again. What the article fails to adequately evaluate is the increased 3D separation with the larger sensor, and the generous file latitude that comes inherently with the larger pixel pitch. In ‘real world’ use, the Fuji delivers a RAW file that can be tinkered with to your hearts content whilst still delivering astonishing tonality and, in some images, displays the hallowed medium format look of depth that I rarely saw in my full frame work. The latter will also be helped by the absolutely stellar 45mm that I shoot with. Like Mrs F and I, that lens and sensor are a match made in heaven.

Blackpool 15

Blackpool 15

The absolute best thing that I’m enjoying about the GFX is the ability to shoot the camera hand held. I found that to get the K1 to really sing, it demanded to be put on a tripod. And whilst the IBIS was very useful, it was always at the expense of a slight loss in sharpness. Then at shutter speeds between 1/60 - 1/180 I rarely got a critically sharp image, I assume due to mirror slap. Essentially, unless I was shooting with a tripod, I would usually come home disappointed. So I just ended up always shooting with a tripod

This, I’m delighted to say, isn’t the case with the Fuji. Anything I’ve shot above 1/100 (with the 45mm) and we have a more detailed image than what I’d have achieved with the Pentax atop a tripod. I also don’t have *any* issue shooting at ISOs up to 800 with this camera, and if you hadn’t guessed by now, I’m a fussy beggar, so lower light is also a possibility hand held. This means that the MF Fuji is more of a throw over the shoulder, take anywhere camera than the Pentax was to me… not something that would ever have been associated with a MF rig in the past. Well done Fujifilm.

Blackpool 18

Blackpool 18

What I like:

  • Build quality is great… not quite Leica/Zeiss engineering, but still very pleasing to the hand. This is clearly a professional grade construction, and the weather sealing of the body AND lens comes in handy living in the wet and windy UK.

  • Customisation: get everything you want assigned to the buttons you want.

  • IQ and file pliability to die for (+++)! And without a tripod when the mood takes me.

  • 4:3: I loved the 6:7 negs from the Mamiya 7. Provided I could step backwards, it felt like I was getting the same width as 35mm frames, but with more image at the top and bottom, which is usually where I’d want it. I’ve taken to 4:3 like a fish to water. One unexpected bonus of this format is that I’m beginning to shoot portrait orientation again after at least 2 years of avoidance. 3:2 is great, but I find it a little ‘long’ when tilting 90 degrees. Of course you can crop in post, but having tried this a while ago, it just didn’t work for me. I found I had to compose in the aspect ratio native to the viewfinder. Thinking about it, I went through a 1:1 phase quite a few years back, which is when I last had an EVF, allowing me to compose with that format. Which leads me nicely on to…

  • Having an EVF again. It turns out that WYSIWYG is preferable in both cameras and people. But I also miss the OVF! Can’t have it all Mr Feltham ;)

Blackpool 19

Blackpool 19

What I don’t like:

  • As mentioned, I’ve become accustomed to an optical viewfinder over the last 6 years and enjoy framing quickly to see if there is potential. Now I have to turn the camera on and wait few seconds before scoping out a scene. It doesn’t sound like much, and in reality it isn’t, but it’s still something I have adjust to. Whether this becomes a long term gripe remains to be seen.

  • The lack of a lock on the E/C dial meant that I’d sometimes have nudged it without meaning to and not noticed leading to under or overexposure. Given that I can push an image by 2 stops in post without any noticeable penalty means that this hasn’t caused me bother… yet.

  • The 3D electronic level needs to be activated every shot then needs to be turned off (by half-pressing the shutter, or pressing the assigned Fn button) before manual focussing. This seems like two unnecessary button presses to me. Surely a turn of the focus ring should deactivate it? Can this be changed in a firmware update please Fujifilm?

  • The final gripe that again could be addressed in firmware, relates to how bracketing is switched on. You can assign an Fn button to bracketing settings, but to turn on any of the bracketing options you need to delve into the drive menu. For me, I’d rather have the option of turning bracketing on/off via Fn then arrange the settings either by another Fn button or dive into a menu if I ever wanted to change my standard bracketing preference. 

To draw these thoughts to a close, having owned the camera for a month and taken over 1000 photographs, I have to come back to the jaw dropping IQ. For the first time ever, I’m consistently seeing the images on screen that reflect what I saw in the scene when taking the photograph. The GFX is transcribing the light into a digital file with unerring precision. In essence, the 50R is making my job as a photographer easier to produce the look in my work that I want… and that’s got to be worth paying a few pennies for, hasn’t it?

Palma’s 1

Palma’s 1


Adventures with the Silver Halides (Part 2, Film vs Digital)

I had them in my hands: the first set of negatives from my Mamiya 7 and the scanned images on a CD. This was going to be great. Finally… real film tonality and colours in my work. I couldn’t pace home fast enough. I must’ve looked ridiculous with the negs in my hand, power-walking up the road like I was in critical need of the loo.

I fired up the laptop, thrust the disc in an waited to be stunned. 

Only I wasn’t. 

The colours were bad. I mean really terrible. I could’ve cried. 

I really wasn’t expecting to have to work on the negatives. That was part of the initial appeal of film for me… great colours out of the box. I concluded that I didn’t want to pay for someone else to do the scans only for them to come back with shitty tones… so I started to read round the subject even more obsessively than I had been. It turns out that people use their DSLRs to ‘scan’ negs, then convert in photoshop. So this is the path I initially veered down to try to get the hues more to my taste.

Two film and one digital image... can you tell which one is which? Which do you prefer?

Two film and one digital image... can you tell which one is which? Which do you prefer?

At first I thought I had everything I required, but it soon became apparent that I needed a lightbox (the iPad screen was too pixelated, despite covering it with a diffusing plastic cover), a 120 film holder, a blower and some white gloves to handle the negs with.

After some early hints that I was on the right path (i.e. the Portra colours I had been expecting), I started to get some strange ‘vignetting’ in the shadows of my images. I spoke with numerous film aficionados but no-one had an answer. Eventually I gave up on the DSLR and forked out on a real scanner (Epson V800)… only to find the vignetting was still there when I used Silverfast!! I could’ve cried (again). Finally I tried a ‘straightforward' import with EpsonScan. I had had so many failures and false starts I was actually was shocked when it turned out fine. Surely now I was ready to begin?! Err, well no, actually. Scanning itself is a ‘dark art’, to quote my good friend Tom Sebastiano… film was proving to be trickier than expected.

As with any dark art, there is a road to enlightenment regarding scanning and colour management of film. It’s not a short path either. I am by no means an expert, but remember Tom S (he does have the necessary expertise, and his blog is a wealth of information) mentioning a magenta cast that he was noticing in some of my work. I hadn’t spotted it up until that point. Now I was seeing it everywhere. This was a steep learning curve, but with a strong emphasis on ‘learning’. I could cope with that.

Eventually I had a workflow that was beginning to produce the goods and I was simultaneously being swept off my feet with the process of using film. Heady times. Meanwhile, the DSLR was at home gathering dust.

From L to R: Mamiya 7, Portra 400 scanned at my local lab; same neg scanned with Epson V800; Nikon Df, Sigma Art 35mm

From L to R: Mamiya 7, Portra 400 scanned at my local lab; same neg scanned with Epson V800; Nikon Df, Sigma Art 35mm

The passionate love affair was, it turns out, a bubble waiting to burst. I found myself dropping two or three rolls to be developed each week. 30 exposures and at very minimum, 80p per shutter press (£5 per roll of 10 exposures and £3 to develop). That’s ignoring the cost of professional or home scanning. Yet with each roll I was regularly only getting one usable shot… and sometimes not even that.

The final nail in the coffin for this intoxicating romance was hammered home during a shoot on holiday in Norfolk. As I was going away with the kids, I decided to only take my DSLR so I could snap away and capture some memories. On an outing we pulled into the car park at Winterton-on-Sea and there at the edge of the sand dunes was a collection of black huts that were screaming to be photographed. I got to work trying to find the best composition, then proceeded to spend the day on the beautifully wild Winterton beach. During the day I needed to get something from the car, and on my way back I decided on one last sneaky shoot of the huts, which in turn delivered the composition that worked best.

Winterton-On-Sea (Nikon Df, 35mm Sigma Art)

Winterton-On-Sea (Nikon Df, 35mm Sigma Art)

On reflection, I concluded that there was no way that I’d have worked the scene in such a manner with film. The cost was too prohibitive for that, so if I’d had the Mamiya I would have come home with a lesser image on the roll. Whilst the process of making an image is definitely integral to my overall enjoyment of photography, this experience is rarely meaningful to the individual who views the final photograph. Producing the best images I can is (for me) far more significant than the equipment that gets me there.

This discussion wouldn’t be complete without mention of my digital set up, the PentaxK1 and three FA Limited lenses. The K1 is a R&D departments wet-dream, with everything you can imagine packed into that little black box.  I don’t use three-quarters of all the features, but the ones I do use simply help me to make a better photo. It took about a week to set up (seriously!!!), but now that is done, I just have to turn one dial and I am ready for tripod shooting (with image stabilisation turned off, two second shutter delay, ISO100 etc), another rotation and I’m ready to snap pics of the littluns. 

The key component of the K1 is the Sony sensor within the camera. With 36MP to play with, the resolution easily bests the clarity I can attain from flatbed scanning… that isn’t to say that a drum scan wouldn’t radically improve the film files, but then we are talking much more £££. Most significantly, I find the huge dynamic range of the sensor gives me the squeaky clean shadow control of the best digital files AND the astounding highlight control of film. I can’t really seem to blow highlights, just like when I’m using Portra. I’ve had the camera for over a year now, and it’s only weakness seems to be the AF system. That isn't of critical importance for my work so I genuinely cannot see me needing another camera (note to self: don’t read this in two years time, you’ll have egg on your face). The K1 is the best camera I’ve owned. There, I said it. And it feels good. I hope you feel the same way about your set up too.

Hinchingbrooke Park 4 (Pentax K1, 43mm Ltd)

Hinchingbrooke Park 4 (Pentax K1, 43mm Ltd)

Digital is far more technologically advanced, but there is an undefinable magic to film. Same as putting a needle on a record. Everyone I know personally who uses film does so because they enjoy the methodical process of using the stuff… and I experienced the very same kick. In contemporary society, film is delightfully at odds with the increasingly instantaneous nature of our lives: with drive-through coffees and Mr Google answering any conceivable question you can throw at him. Film is tangable, film is hardwork, film is serendipity, it has personality and at times it can be frustrating. But when you get a fine shot from film, you have earned every exposed crystal of silver halide. 

Everything gear-related in photography is about compromise and you need to decide which tradeoffs you are happy to live with and fit your style best. I have come out the other side of my film adventure with a much greater knowledge of colour management and huge appreciation for those that shoot film, achieving a consistent look that digital shooters can only dribble at. But I’ve also realised that I don’t have the time (with two kids) and financial resources (with two kids) for film… at this moment in my life.

The question is, do you have the heart for film? 


Adventures with the Silver Halides

It’s something I’ve been toying with for a while. Actually, a very long while. As a ‘dyed-in-the-wool’ digital shooter I just wasn't sure analog life would suit me. After all, I’m used to the mod cons of histograms, image review and Auto ISO. And by investing in good glass I’ve grown accustomed to a clarity and sharpness in my work that frankly looks fantastic both on screen and in print. Add to this mix the VSCO Portra Lightroom presets and I surely have the best of both worlds… film-like colours with digital convenience.

Despite this I couldn’t shake the niggling feeling that I should give film a try. Simulated film presets get you most of the way there in terms of analog tonality but, to my eyes, still not close enough. On top of this, you can get some supremely wonderful pro-grade film cameras for comparatively little money on eBay… although in fairness this can be a bit of a lottery with potential pitfalls aplenty. 

Bailiff Street (Portra 400, 65mm f4)

Bailiff Street (Portra 400, 65mm f4)

So here are the pros and cons of shooting film as I see them:

Pros:

  • Oh the colour!
  • Can get a medium format rig for relatively little money, something I’m definitely not doing digitally this side of Christmas
  • Colours
  • It would be an educational adventure into unknown photographic territory
  • Colours
  • Colours
  • Astonishing highlight control. You just can’t blow your highlights on colour negs it seems.
  • Finally, it would be remiss of me not to mention those breathtaking film colours & tones

Cons:

  • Each press of the shutter costs money
  • I’ve already got a digital workflow that works and, most of the time, I get near enough to the results I want
  • I’ll admit it now: I’m like a spoilt child after a shoot… I’m pant-wettingly desperate to review the results the instant I get home. I’m just not sure I could cope with the wait for film to be developed.
  • Not as convenient as digital shooting
  • Loss of some of the clinical IQ of digital - although depending on your point of view this can also be a pro.

To sum up, it’s essentially all about those filmic colours that are giving me the itch I can’t scratch… and no, yoghurt didn’t work either.

Despite pondering the move for some time, previously I’ve always decided to stick with what I know best. So why the leap into the unknown now? The reasons I’ve been pushed over the edge are twofold; Firstly my technique over the past couple of years has improved hugely, with the biggest jump being after the purchase of a tripod about a year ago. Therefore where I was reliant on high ISOs before, now I largely shoot at base ISO even at night so we are firmly in fine-grain film territory. Secondly, and probably most importantly, I used to return from a days shooting with 100 or so different shots on the SD card. I still often return home with about 100 digital images to process but now they are only of 6 or 7 differing subjects and I cherry-pick the best captures. I’m much better at sorting the wheat from the chaff before pressing the shutter button. Altogether this has led to a much slower, methodical pace to my shooting… a pace which, you guessed it, suits film.

So despite the potential negatives, I decided to take the plunge… and if it turns out it’s not for me I can pop it back on eBay from whence it came. 

Next decision, what system to go for. I wanted great IQ, and something complementary to my DSLR. Medium format would tick both boxes but I also didn’t want a huge camera so it looked like the SLRs were out. I quickly honed in on a MF rangefinder as it would give me a different style of shooting and the lenses are tiny, even compared to most full frame DSLR glass. 

  • Mamiya 6 - Although I like 1x1 aspect ratio I didn’t want to be confined solely to that.
  • Fuji (various) - From previous experience I know Fuji makes exceptional glass but as far as I’m aware their MF rangefinders are all fixed FL lenses, and I’d rather greater flexibility.
  • Bronica RF645 - It looks like a wonderful camera but if I’m going MF I want the biggest negs I can get so 6 x 4.5 cm isn’t top of my shopping list.
  • So on to the Mamiya 7 system. 6 x 7 cm negs. Straightforward operation. And best of all it seems to have some exceptional glass at the wider end of the scale - huge tick! The hunt was over.
Martins Yard (Portra 400, 65mm f4)

Martins Yard (Portra 400, 65mm f4)

Thanks to the advice from two Flickerite Toms (Invernodreaming and Photom) and my old friend Mark Heaver (MrHeaver), I had what I needed to start browsing for the camera. Tom Invernodreaming suggested I invest in the cleanest copy I could - this sounded like sage advice as I was going to buy a camera that is 20 years old, with few options of repair if something goes wrong. Photom gave me the insider knowledge on the Mamiya (he shoots a 7ii) so I knew I was eyeing-up a fine piece of equipment. Marks tuppence, as a long time Leica shooter, was the reassurance that the rangefinder works well in low light… an important consideration for me.  When a mint condition / boxed Mamiya 7 and 65mm f4 appeared on eBay I knew it was the one. BIN :)

I waited patiently (something I don’t do well, as noted above) for the package to arrive from Japan. After being stung for about £200 import tax it took the total cost to £1150 for the set- up. I knew I could’ve got the camera / lens cheaper but it really was in ‘as new’ condition, so felt this was a fair outlay.

At last it was time to load some Portra and embark on a shoot… with silver halide.

Racecourse (Portra 160, 65mm f4)

Racecourse (Portra 160, 65mm f4)

I found the Mamiya to be simplicity itself to use. All the trappings of modern photography are absent leaving a camera with purified gestalt principles on show. In turn this virtually renders the instruction manual redundant. Once the shutter speed and aperture are set (the ISO is of course static corresponding to the loaded film speed), there is a meter reading in the viewfinder that indicates the correct shutter speed for your chosen aperture on the lens. Given that the camera employs a leaf shutter in its lenses, you can easily hand hold the camera at 1/15th second with good technique. So we have a user friendly experience that produces large negatives. Super.

Another aspect that was new(ish) to me was using the rangefinder. I’d shot a few frames on various Leica’s in the past, but never owned a RF. It turns out to be very easy to use. You just manually focus the lens until both the focus patch and the RF patch in the viewfinder align and thats it. The proof was in the pudding, with 10 exposures perfectly in focus on the first roll of negatives… well make that 7 as I had forgotten to take the lens cap off for 3 frames. As the viewfinder isn’t ‘Through The Lens’  there is no indicator that the cap is on or off and therefore you just need to build this check into your process of setting up a shot. I have gotten better at remembering this but nonetheless this is a niggling frustration I have with the rangefinder that continues to rear its ugly head on occasion. 

It is also worth mentioning that the accuracy of the frame lines usually include more of the scene than they suggest. According to the manual it is 100% at closest focus, reducing down to 83% at infinity. This phenomenon has actually led to some happy accidents, with unintentional objects appearing in the negative but improving the overall piece. Of course one can crop to the originally intended composition if the additional scenery detracts from the final image.

Abington (Portra 400, 43mm f4.5)

Abington (Portra 400, 43mm f4.5)

In terms of exposing the photo, there is a vast amount of latitude with colour negative film, particularly in the highlights, so use this to your advantage. In fact it is the exact opposite of digital photography, where highlights are easily blown but shadows can usually be lifted to reveal detail in a RAW file. When loading the film, I tend to meter / overexpose the image by a stop or so by setting the film speed on the camera at ISO 200 when I shoot with 400 film. Also I meter for the shadows to ensure there is always detail there, as I know that the highlights look after themselves. I have invested in a handheld meter (Sekonic L358), but find the readings from the cameras meter (somewhere between centre-weighted and spot) to be similar… I just point the focus patch or light meter at the darkest point of the scene and use that reading for the exposure settings. Easy.

The protracted wait for the the negs to be developed and scanned was something I wasn’t sure I’d like (I’m a child about this, remember?). Compared with the digital workflow, I am forced to defer my gratification, but that building anticipation turns out to be something I genuinely relish... and the excitement is frankly at boiling point by the time I pick up the negatives. Shooting film is an extremely enjoyable process and it’s making me a better human being

So what did I think when I finally received the first set of developed film back from the lab? This key question will be covered in my next blog when I’ll attempt to tackle one of the biggest photographic questions of our time: Film vs Digital… stay tuned!

Please note: This blog was originally started in 2016, but thanks to Chris Simonsen for inspiration to finish the bloody thing. 

10 Easy Steps to Developing Your Own Photographic Style

There is a precious commodity in photography that many strive for and yet it seems only a handful of lucky folk obtain: the skill of having a unique photographic style. Despite the apparent scarcity of this ability, I’m certain that anyone can bring their own individual voice to the table provided you apply a little discipline to your image-making. It is therefore the aim of this blog to give some pointers to help you cultivate your personal flair and make your images stand out from the crowd.

High Line 1 - A trip to New York in March 13' is where I felt my style really crystallise 

1. What do you want to say?

What are the distinctive characteristics of your take on life? Essentially what makes you, you? Do you want to bring humour / pathos / humanity to your images? Do you want a straight-up documentary style or execute an abstract aesthetic, or somewhere in-between. Pick a stance that sits comfortably with your ego and go forth, hand in hand when framing the world.

2. Shoot for a while with one prime lens

Not only will you learn to ‘see’ in that focal length but your images will have a continuity as well. If you don’t have any primes, just keep the zoom at a set focal length that you prefer… you can even stick a bit of tape on it to keep it set there. If you are uncertain of what your favoured focal length is, if you are a Lightroom user help is at hand. Enter the Library Module select ‘All Photographs’ from the Catalogue panel on the left, then do a Library Filter with the focal length metadata to see which one you use most commonly. Easy.

3. Notice repeating themes in your work

When my style was forming, I noticed a leading diagonal line in the foreground of several images I liked. Once I’d clocked this, I actively sought to add these to the composition when framing the world. This led to a subtle continuity between one image and the next. A piece of advice I gleaned from one of my favourite photographers, Todd Hido, is to “…find a place you trust, and then try trusting it for a while.” This quote is apparently from a list of ‘rules’ pinned up in his office, written by Sister Corita Kent. Repetition is part of the creative process, as well as reviewing and ruminating over past work that resonates with you.

Racecourse 2 - The diagonal line in the foreground was deliberately added to the composition

4. Shoot exclusively in colour or B&W for a while

Totally self explanatory but also a fundamental in my opinion. Remember, I’m only suggesting you do this whilst your approach evolves in order to speed up the process.

5. Find a project

What better way to uncover a cohesion to your work than by declaring a unifying theme to your excursions. It doesn’t have to be highfalutin or conceptual, just shoot a series with the colour red as a subject, do a street photography project with people wearing hats, look for visual optical illusions (hard!) when you shoot… basically whatever will inspire you to get out of the house at 0500 on a Sunday morning when it’s pouring with rain!

6. Stick to an aspect ratio

For about a year I shot almost exclusively in square format and the acceleration I felt in my development was exhilarating. By solely shooting 1x1 I believe I learnt what works and what doesn’t at a quicker rate than if I’d been chopping and changing aspect ratios. Recently, I’ve mainly been shooting 3 x 2 but what I find really interesting is that most my current work would still look fine if cropped square. The foundations I laid back then have evidently stood firm. I’ve also seen photographers shoot exclusively in portrait orientation and when you look at their portfolio this lends a characteristic harmony to their work.

Billing Road - A recent piece that would also work cropped square

7. Find a ‘look’ and stick with it

By that I mean get a fairly standard post processing workflow… don’t saturate one image then leave the next one neutral. Always apply a vignette… or not. Do you like your images to be low contrast or high? Presets can help hugely with this. Once you’ve worked out your sharpening techniques and application of contrast, etc. standardise this and save it as a preset you apply to every image. If you add a border around your photos, stick with the same dimensions and specifications each time… it’ll make an image look like YOUR image.

8. If it ain’t ‘you’, don’t show it!

If you’ve religiously followed steps 1 - 7 you will hopefully be well on your way to cultivating a characteristic approach to your image-making. Now your job is to be ruthless and unyielding with your style.  I take (or at least pre-visualise) shots all the time that I feel are ‘interesting’ but they just don’t fit with my aesthetic. They just are not ‘me’… so either the files sit on my hard drive or I don’t press the shutter in the first place. It’s that simple. 

An example of a shot that I like, but I just don't feel it's 'me', so you won't see it anywhere else!

Which leads us perfectly to step nine…

9. Only ever show your best work

This has to be one of the most important bits of advice that I can impart… (that, and this game is all about the *LIGHT*). If it isn’t up to scratch then leave it on the hard drive. When I go out on a photowalk I’d estimate that I come back with something worth posting on Flickr about 50% of the time. Yes, it’s frustrating sometimes but when I do come back with a good shot it’s an even bigger thrill.  And looking back over a years work, I’ll have maybe nine or ten images that I am truly happy with. That’ll be from 10 000+ shutter actuations. Ansel was right; it’s not easy to get a compelling shot.

10. Be disciplined with the above

Once you feel that your characteristic approach has crystallised then you can start ignoring one /some / all of the above as you’ll have hard-wired your modus operandi into each shutter count. But you need to give yourself a fighting chance of reaching Nirvana by applying some discipline on the way. 

Thankfully the above 10 steps aren't as challenging as perhaps they sound simply because the photographic journey is as equally satisfying as the destination.

All thats left is for me to wish you luck achieving your goal and I look forward to seeing your personal take on this wonderful world sometime soon.

Teignmouth 2


Photographers Luck

Its been *far* too long since my last blog, but thats what having a one year old does to you, I suppose. However a shot I took yesterday inspired me to put pen to paper, so to speak. In fact it was actually several shots that culminated in the cogs whirring but the image that sparked it all was this one:

Now it’s not my best shot ever or even my favourite from recent weeks, but it was my choice capture from the Sunday morning shoot in Milton Keynes and one that I was certainly very happy to post on my Flickr stream. More importantly it precipitated the following discussion in my head… and isn’t that what Art is supposed to do?

So the subject of this blog is this: Photographers Luck. Fortuitousness. Serendipity. Call it what you will, but we all need a good dose of it once in a while to bag a keeper whilst out hunting for our next photo.

Why exactly did this photo set off all neurones firing in my brain? Well, being 1/2 hour away from where I live, I’ve photographically explored Milton Keynes many times… and I often find myself framing a shot from one of the numerous underpasses you come across. All of them are very similar to each other but they all have a slightly different personality; be it due to a blown bulb, a bit of graffiti or a missing stone from the wall. There’s always something different to spot when you walk into the next one. Whether or not that underpass delivers a scene worth documenting is another matter altogether. Indeed, it was only two weeks previously that I went on a night-time shoot and took this:

I like this shot, but I don’t *love* it. I thought about posting it, but decided against it as it just didn’t quite grab me by the short and curlys. There's another 'splatter' shot on my Flickr stream that I prefer. No photographers luck that day.

Conversely, when I came across the scene on Sunday, I was instantly seduced by the laser beam of light bisecting the wall. I couldn’t work out what was happening but I instantly knew I’d struck it lucky.  Most of the walkways in MK are made up of two underpasses with an open air gap in-between. These double acts correlate to each direction of dual-carriageway above . When I moved on to it’s twin underpass just slightly east this is what I saw:

Apologies for the dreadful diagram. 

And getting a little over excited about it all...


I think its good, but with the whole lower half of the image bathed in morning sun, I don't find it quite as engaging as scalpel-like shaft found in it’s westerly brother. When taking in this lesser scene the penny dropped. The sun was at the *perfect* angle to allow for that sliver of photons to travel through the gap between each underpass. The light had travelled 150 million km only to be soaked up by the roads above, except for an inch-thick streak bursting through. The fact that it was joining up the thirds of my framing whilst simultaneously creating two triangles in the image… that was some mind-blowing geometry in front of me.


I thought to revisit the underpass where I’d been two weeks earlier… perhaps this could be an even better image?

In a word, no. There are now two subjects vying for your attention: the slash of sunlight and the splat of oomska. Too much. Irrespective of this however, what’s really interesting is that this is taken just 1 minute later than the first shot (I checked the EXIF) and notice that the shaft isn’t so precise. It’s getting thicker from the ever rising sun. One minute making the difference. Serendipity playing her hand again.

One aspect I love about this crazy passion we share is that different times of day/month/year can yield drastically different results. I often like to think of one place as two completely different playgrounds… that of day and night. An area that is full of opportunity by day may afford nothing by night and visa versa. Therefore one way to cook up some of that elusive elixir called luck is to plan to visit the same place at several times of the day and night and on different days of the week. Shots that are possible on a quiet Sunday morning probably wouldn’t be so achievable on a busier Saturday am, for example. 

Lets face it, if I’d wandered through that fateful underpass just 30 mins later, it probably would have been a plain-jane walkway with little to entice me in… Or would it?! How am I to know unless I go back again at different times of the day? One thing is for sure: if I had been there just 10 minutes earlier then there would be no beam of light… but there might have been a weasel riding a woodpecker. Too late, I missed them. This time. 

Above is my favourite shot from these underpasses (and one of my favourites of all time, for that matter). Clearly this could only be taken in Autumn. I was in the right place at the right time. It leads me to ponder how they look shortly after a snow blizzard arrives… but I’ll probably be wondering this for some time as I’d also be stranded in Milton Keynes in that eventuality. 

On Saturday night Mrs F and I sampled a few too many gin cocktails (much nicer than I was expecting), but I still set the alarm for 06.00 having only had 5 and 1/2 hours sleep. I dragged my sorry arse out of bed to go traipsing around MK at 7am on a freezing Sunday morning. In doing so I maximised my chances of getting that keeper. I created my own good fortune. 

So although we sometimes need a little luck to fire the shutter at the right place and the right time, we can surely boost our odds by putting in some good old fashioned *effort* to capturing that decisive moment. To close with a quote from Benjamin Franklin, "Diligence is the mother of good luck."

Stay lucky :)

Nikon Df Review...

…I didn’t think I’d ever be writing this, even a few short weeks ago.

Surely I’d never forsake my beloved Fuji X-Pro 1…

And the divine XF14mm?

Both gone!

So what went wrong with the love affair that I thought would last forever*?

* Please note: ‘forever’ in digital photography equates to an absolute maximum of three years.

Chipboard Surround

Alas the gallery that sells my work, Redbird Editions, said that my latest images had reached the limits of the cameras capability. They just weren’t clean enough to print. Many of the recent shots I’ve taken were at ISO 3200 - 6400. Even the Prince of low-light, the X-Pro1, couldn’t produce files that were good enough. Feeling emasculated, I was given a firm nudge towards full frame. But I really didn’t want to sell my Fuji gear, we’ve properly bonded over the past two years and grown to love each others quirks.

I can image some of the good folks who read this will be shouting at their computer screens hollering, “Why didn’t he just use a tripod and lower the ISO?!” To get the majority of my images I’m either climbing into a disused factory or traipsing around Northampton until I find something of intrigue. Either way, I need my kit to be as small and light as possible. I’d considered a tripod, long and hard. What’s more, I suggested to Redbird that I could try retaking some of their selections with a tripod, but their answer was clear. For their large, high quality prints the X-Pro comes up short. Gutted.

But what to choose? The realistically priced options then (sorry Leica):

Sony A7R, Canon 5DIII, Nikon D610, D800 and last but clearly not least the Df.

So my priorities were: as lightweight/small as possible and fantastic in low light. Straight away the heavier/larger DSLRs were out for me. Bye bye 5DIII, D800 and the D610. This may seem like a rash move but my back aches enough without any camera gear over my shoulder. The weight of a system is important to me. Just the Df and the Sony in a straight shoot-out then. The Sony came close. Really close. Alas it fell at the final furlong for two reasons:

Lack of glass - Coming from Fuji, it’s my understanding that many NEX users decidedly covet the Fujinon glass despite Sony being the more mature system. Doesn’t bode well for the A7R. 

I could use adapters but from what I have seen wide angles are generally below par on the A7R… Almost all my fine art work is shot at 21mm. Looking at the lens roadmap, I could be happy with the system in 2015 but that’s not now… Bugger.

Retail Park 4

So on to the Df: It’s Nikons lightest and smallest full frame camera - tick. After loving the direct controls of the X-Pro the Df was also the camera that tugged the hardest on my heart strings - tick. Finally, its sensor is rated by DxOMark as the world beating king of low light photography - game over. Of course, it does’t hurt that it looks bloody beautiful as well ;-)

Prior to buying the camera I was aware that the Df has had it’s detractors but knowing how I shoot, I was pretty sure the negatives wouldn’t really affect me.

So lets address some of the criticisms I’ve read about the Df (often, I suspect, from people who haven’t even handled the camera yet):

Sub-standard AF - Errr, I’ve come from the Fuji X-Pro1… With the Fuji** I’d sometimes be stood there waiting to get focus whilst a cup of tea is going cold and another hair on my head is turning grey… I can’t believe people moan about this! “…39 vs 51 blah blah…”

** I should say at this point that the Fuji AF didn’t really bother me for my style of photography, but for others it might be a deal-breaker.

Confused Controls - Once I’d set up the camera I can categorically state that the user interface - the physical dials - are perfect for me. I shoot in either M or A mode usually with Auto ISO on, so the direct dials mean I never have to menu dive. The elements that make up exposure are at my fingertips. Perfect.

One elegant use of the dials is that once the Max ISO is set for Auto ISO, this figure can be overridden using the ISO dial manually. For example, if I have 3200 set as default max ISO but things get dark (as is usual in my photographic world), I can quickly set 6400 or 12800 on the dial and still get the shot. Not a menu in sight. Why do some people not appreciate that such manual control isn’t necessarily a retrograde step. Perhaps getting rid of them was maybe an error in the first place? 

There are also little things that for those who reside in Nikonland will be familiar with, but coming from Fujiville seem like such a luxury… the little dial for metering for example. I usually shoot with spot exposure, but can change to evaluative metering in an instant should the lighting call for it. Again, no menus. Happy days!

Whats even better is that in M mode with Auto ISO on, Nikon allow for the Exposure Comp dials to work by altering the ISO up or down. Brilliant! Are you listening Fuji?

No in-built Flash - Oh wait, best performing high ISO in any camera ever. Who needs flash!? I can understand that for some, they may wish to trigger their speedlights from the on-board flash. If this is your modus operandi then there may be better cameras for you. Should I want to occasionally dabble in a bit of fill flash, the leaf shutter and fantastic built-in flash on board my X100 will cover that with aplomb.

No Video - I’m a stills photographer, not a videographer. Never used video before. Am I about to start any time soon? Very much doubt it…

Only 5.5 frames per second - could be 2 frames per second and I wouldn't care less. I never ever use burst mode as I like to feel that I’ve captured the decisive moment, not the camera.

Max Sutter Speed only 1/4000 - My average shutter speed is probably 1/60. Enough said.

Too expensive - Well the Df is £2749 with kit lens in the UK. This would equate to approx. £2500 body only, but this option isn’t actually available in the UK market yet. There is no doubt that this is a pricey camera! For comparison: the D800 = £2050 body only, D610 = £1500. 

I decided that the grey market option was a no-brainer for this camera… Panamoz.com offered a 2 year guarantee for £1790 with the 50mm kit lens. That’s £1000 cheaper than in the UK or to put it another way, over a third off the price off. It’s essentially the same price as the D610. 

So that means I have the sensor of the £4000 flagship D4 for just over £1500. Same price that I paid for my X-Pro1 give or take 50 quid. Doesn’t seem so pricey now…

The commonly made criticisms therefore didn't seem particularly relevant to me, so I took the plunge. If you are thinking of buying the Df  how do the negatives stack up against your requirements?

Retail Park 3

I suspect that by now you can guess that I like this camera… A lot. But is there anything I don’t like about the Df ?

Despite it being the lightest full frame DSLR that Nikon produce, it is still heavier than my Fuji, especially with the Zeiss 21mm attached! That lens weighs about as much as the camera body. That is hardly the fault of the Df however. And this is all forgiven when I look at the files when I get home. Sumptuous.

Edit (9th March 2014): The size and weight of the Zeiss was getting to me, so I compared the Nikon 20mm 2.8D with it. The Zeiss, whilst fabulous to the edge of the frame, is now sold as in the centre they have very similar performace at f2.8 and f4. The 20mm, like Goldilocks' porridge is just right on the Df.

Here is an image taken with the 20mm (as is In And Out 1 below):

1< (Nikon 20mm 2.8D)

Also, I do miss the EVF on the X-Pro1 as a means to assess WB and Exposure. The ‘mini TV’ would fairly accurately replicate the final image in the viewfinder prior to the shot being taken.

Additionally, the EVF would allow me to compose in 1x1 which is my current format of choice. There is a grid overlay in the Nikon OVF which shows 1x1 but it is nowhere near as clear as the square format option in the EVF of the X-Pro1.

Finally, it seems there is an option in other Nikons to double tap a button to format SD card. Please Mr Nikon San can we have this in a firmware update? If that was implemented, I would only need to access the menu during a month of Sundays…

In And Out 1 (Nikon 20mm 2.8D)

The aim of this review is to perhaps coax a few people who are considering the Df towards the camera because it might fit them well too, but also to deter others for whom another option would suit them better.  Essentially what I am trying to say is that the Df isn’t for everyone, or even lots of people… But for those who want it’s standout features, there is nothing else that can match it on the market IMHO.

I wish the forum troll could understand the saying ‘Horses for Courses’ rather than bleating on about statistics that don’t take into account an individuals photographic style. Whoever thought up the expression ‘measurebating’ hit the nail firmly on the head. Certain forums would be much more pleasant places to hang out*** if we could all understand that what works for one, maybe doesn’t work for another. And why all the pent-up aggression about it? Seriously, life is too short. Get into knitting if photography is making your blood boil so readily. And you’ll give yourself piles…

*** Despite this, I am a glutton for punishment as I still seem to come back for more.

So for now, I’ll let the people who don’t get the Nikon Df  troll incessantly about what it doesn’t have, whilst I enjoy taking images that aim to utilise what it does have to the fullest extent…

Retail Park 1

Full disclosure: The image Retail Park 4 is a reshoot from my X-Pro1 images (as are most in this article), but the leaves in the image have been Photoshopped in from the original Fuji file. Autumn has long gone after all…

A review of the Fujifilm XF 14mm Lens

For this blog I want to take a real-world look at the 14mm XF lens for Fuji’s X-Series.

Please click on the images to view them in a Lightbox.

Similar to my ‘review’ of the X-Pro1 for Urbexing (here) this won’t be a technical analysis of MTF charts or an examination of the extent to which the lens vignettes. These can be found in depth here (DPReview) or here (Lenstip). This blog aims to look at how and why I started to use the 14mm for virtually every shot I take.

When I got my X-Pro1 almost a couple of years ago (time flies when you are having fun), I purchased the full kit, i.e. the 18mm, 35mm and the 60mm. The 35mm was, for me, the one... So sharp wide open, which made it a low-light beast. The 18 was getting some usage and the 60 often sat at home... alone (despite it’s fabulous optics).

My kit now comprises of the 14, 35, 60 and 18-55mm zoom. Whenever I go out shooting of late my bag contains just the 14mm attached to the camera and the 35, which sits in the bag 95% of the time. The 60 and zoom stay at home, but at least now they have each other. 

I have thought about selling them but have kept them for two reasons: 

1) You take a substantial hit on used gear.

2) In my head there will be a ‘rainy day’ scenario when these two lenses will come into their own. I’m still waiting patiently for that day to come...

Genuinely I could live with just the 35 (for family/personal shots) and the 14mm. Nothing else, nada, ne rien, 何も.

Let’s start with the obvious. This lens has beautiful optics - images are sharp and distortion free at any aperture. The lens is optically corrected too - to such perfection that the Leica engineers would be proud of themselves if they’d designed this lens. It makes you want to go out and shoot with it…

So when I first started using the 14mm I was finding my images just had too much in the shot. There were too many distracting elements and often the subject was difficult to identify. I quickly came to the conclusion that the difference between the 14 & 18mm lenses are huge. I kept at it and discovered two things which made a big difference:

Shooting Square Format - Opting for 1x1 means that a third of the image is removed (that’s complex maths for my feeble mind) which in turn eliminates a third of extraneous objects from the image. This leads to a distillation of the subject matter. Good.

Getting Closer - The second ‘technique’ I employed was to get much closer to what I was shooting. With the 14mm, you get about 90 degrees FOV (although obviously less in square format) which can lead to too many elements in the final image. By getting closer to the subject, in my mind, gives more impact to the shot.

The optical viewfinder of the X-Pro1 is far from ideal when using the 14mm. The whole advantage of using a ‘rangefinder’ OVF is that you can see outside the framelines, but you can’t actually see the framelines at all when using the 14mm. Using the EVF is therefore a must. More importantly when using the EVF, it is easier to alter the angles of the camera so that  the verticals and/or horizontals are parallel. It is very easy to accidentally have a ‘keystone’ effect with such a wide angle lens, so this accuracy is important. What’s more, should I get home, open the files and find the image is more skewed than expected there’s a quick fix. Lightroom 5 has a magic button that corrects tilted and slanted images. Ideal. Kids of today don’t know how easy they’ve got it…

One of the many things I love about photography is the ability to alter how we see everyday objects. This may be by taking advantage of the smaller dynamic range of a camera in relation to our eyes, or freezing time with a fast shutter speed. In the case of the 14mm, the way it amplifies the acuity of angles is one of it’s most appealing features for me. Tantamount to all of my recent Flickr images are taken with this lens, so much so that I consider it to be a hallmark of my style. I occasionally read magnetic reviews of the 23mm and have considered putting it on my lust-list, but I realise I have no interest in it whatsoever. This lack of appeal from any other lens or camera system is solely due to the irrepressible mojo of the XF14mm.